
Two white tubes are replacement Teflon tubes that go up inside the print head just above the tip. These eventually brake down from the temps the print head runs at, especially at 250c for PETg. Don’t change the length. Will have to review the image again for the black parts you mentioned.
Skip to main content
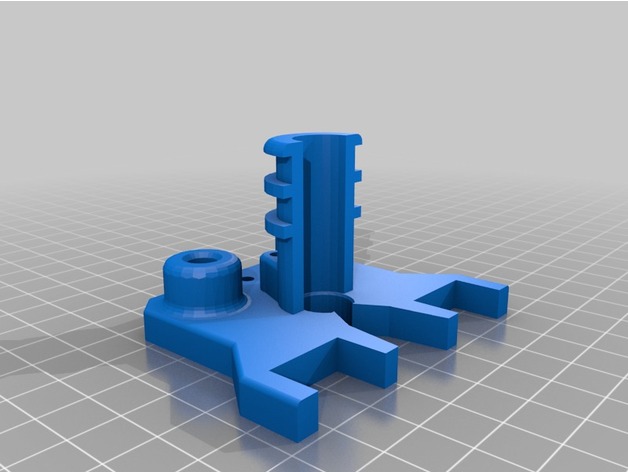
The black part in the image is the fan duct for cooling freshly printed layers of PLA. Install that.
Useful things ha that’s good ! I have seen quite a bit of fantasy character prints etc etc… my interest is mostly functional parts and pieces that I or other people might need.
I installed the duct, put on a reel of PLA, installed the software as suggested in the manual and fired it up for the first time this evening. I wasn’t really sure about this part of it because I didn’t plan to connect it to the USB on the pc. I just wanted to get the basic parameters set and create a file on the SD card which seemed to work ok. I ran a time lapse of the second print since I was not prepared for the first. Stock everything at this point. Will get mirror glass and already have a new hot end pair with nozzles on the way.
Looking forward to trying some PVA supports and some of my own models.
This is what I ended up with.
https://youtu.be/0k-lMmB5xkg 2
Geeez there’s a lot to learn and I’m looking forward to it. Will pick up a copy of Simplify tomorrow…
I did see the post about the strain relief component and thanks for sharing that! Tired puppy now and done for the night.
AHH, That’s what the little black elbow is for!
I attached that to the fan tonight. Running another part right now.
I am attaching my first few parts.
The first pic is a progression. Top left is the first print. Bad. The bottom left is the 4th print. I tried painters tape since I was having a really hard time getting parts off the bed. Doesn’t work very well with the heated bed at 100C!!! It also wasn’t right size wise.
The next print to the right is after I bought Simplify3D and found all the parameters for bed temp, raft layers, etc. It popped off pretty easy and fits. These were the spool adapters.
The last print bottom right is the glass bed clamps. They turned out pretty good except for the drooping.
The engine block I printed on fast, .2mm layers, 60C bed and 205C nozzle. It’s ok but the drooping is bad. I printed this before the glass clamps so I thought the clamps would be ok.
The FU hand pics show the better quality of a smaller layer level, better temp control, and supports.
The main questions I have now that I learned a bit about temps feeds and supports is
1: Why would the finger have such a different texture than the bottom? (granted, this was before I put the duct on the fan)
2: What could I change to make the clamps without adding supports? Or is that not possible since it is a 90 degree overhang.
3: What do you use to get the supports off? Some snap off, but the ones inside the palm of the hand look like a problem. I do have a few dremel tools and various bits but when I tried some they grab and dig in.
I am printing a desktop cell phone stand and it is having some other oddities like blobs and strings so when it’s done I will post a pic of that also.


What made you decide to order a new hot end pair with nozzles already?
I read somewhere about swiss nozzles but I’m curious about your thought process.
Simplify3D is somewhat pricey but it made such a difference in going from “what do I do now” to wow, I am actually glad I bought this thing!
I did hook up the USB cable. I don’t run programs that way but it’s easier to make changes, like LED colors, leveling the bed, moving the machine etc VS using the built in control panel.
I trust running programs from the SD card way more.
One thing I did learn since SD cards are so cheap is 32g seems to be the max for FAT32 formats. I tried a 64G I had laying around but with windows 7 it formats with eFAT, which the machine can’t read.
Osmo Mobile (handheld gimbal) is the piece of equipment and uses your cell phone. Easy as pie and you can also do hyper lapse. I have some examples on my YT page.
Ultimately I want to print other materials that are more abrasive to the nozzles. So now I have spares but probably won’t install them anytime soon since I have a lot to learn with PLA, ABS and PVA before trying anything else.
Leveling the bed was somewhat consuming with the manual method yes but I must be fairly close looking at the printed box.
Interesting progression there. I have the stock bed and covering they provided but I ran the temps way hotter than probably needed. The extruder was set to 220 and the bed to 110. Stuck fine and once a little cool came off fairly easily with a razor blade. Not sure I’d recommend the razor blade thing for everyone you have to be careful. Putty knife worked fine but the razor blade let me remove the piece with the support lattice still attached as seen in the photo end of video.
Single finger salute, nice. I might have to have one of those for my desk.
Oh and I had a look back at the pdf manual and they do mention installing the duct so my bad for missing that one originally.
Thanks! I see the part and grabbed it for my next project once I figure out the new software which I am actually looking forward to. Looks like the guide tubes will stay better supported also. I put a single wrap of tape around mine so they would stay in the hole.
I see you are also into quads, FPV etc. Maybe I can send you one of my little 5V FPV cams as a thank-you for your efforts and contributions here? It’s the same camera I used on all of our micro FPV machines. After 3 years or so I no longer build/sell my micro FPV machines but still have stock on some various parts. Cams, brushless motors, 200mw vtx’s, CL antennas etc.
Let me know.
DB
Bed at 60 for PLA, 65 for PETg, 100 for ABS. The fiver texture (if PLA) is simple because the plastic was not cooled and solidified yet before the next layer was printed; cause things to move and printing like this; hence the need for the cooling fan. This is especial true as you transition into a smaller printed area because the entire layer completes faster and moves to the next layer because there is less to print.
No cooling on ABS.
Support material removal: Hand tools like pliers, picks, small hand drill bits for pockets. Also set Simplify3d to print supports every two layers so they are weaker and easier to brake out. Change the pattern every couple layers also so they don’t fall over on really high support prints (45,45,45,-45,-45,-45)