Yes we’ll join the refund group.
So frustrating!

Yes we’ll join the refund group.
So frustrating!
I think we all want to join the refund group .2 days to load the software for it still not to work is ridiculous!
Hi Andrew
I would be grateful of any assistance I can get to pursue this as the more I see the more I realise that I am not a one off case.
I contacted the ‘support team’ yesterday and received an automated response that they would be in contact within 24 hours (not holding my breath).
My faults so far.
‘pause’ button on the front of the printer stays solid green and does nothing.
I have power (according to the lights) but no control from the lap top I have bypassed the hood switch as directed reset the printer, tried different cables, uninstalled and re installed and disabled and re enabled the ports etc.
When I initially managed to get it to work and raised the print bed I noticed that even if it did work properly that I would not be able to calibrate it as the clip that holds the plate to the bed lines up perfectly with the the nozzle thus not allowing the correct clearance to be achieved.
I am not sure if it is relevant but would like to find out, but I have purchased an Arduino Uno board as suggested on various posts (I am not going to use it in the printer though) and found that the input voltage is recommended to between 7-12v with a maximum of 20v https://www.arduino.cc/en/Main/ArduinoBoardUno 5 (I can only assume that the board supplied will have similar requirements) however, the power pack supplied to do the testing is rated at 24v.
I am wondering if it is worth starting a new post (linked here) to make it easier to find and keep updated.
Barry
07769871406
Hi Barry,
All the balony about the lid switch is total carp.
You can disable it in the software settings. So, none of this depressing the lid switch.
I need everyone’s story of problems.
Going into your email account and search for Eaglemoss and Dbfactory. You need to forward these to my email address if, you wish to have a class action template.
I am very serious about ‘no contact’ with them once, you have exhausted their chance to correct your problems.
I have had all the emails you are talking about and they can’t tell their R’s from their Elbows. They can’t even communicate effectively internally, either it’s a case of Chinese Whisper’s or you end up repeating yourself.
They are expecting us to give in to their fun and games.
They have sold us a piece of poo, based on the Reprap design and I can assure you, you don’t need a hood to print ABS successfully.
Everything they have commissioned with the Vector 3 is flawed.
If your new filling fell out by the dentist. Would you accept it if they said come back next year or see another dentist?
This is what Eaglemoss and Dbfactory are up to, passing us from pillar to post and back again.
We shouldn’t have to seek out our own fixes. We paid for a product and it’s not fit for purpose. How much anxiety and stress, not forgetting time, have you left?
Would they put up with it?
We want our money back and compensation.
My dear late Uncle, who recently passed away, used to quote ‘the squeaky wheel always gets the oil’ and this what we are ‘the squeaky wheel.’
Kind Regards
Andrew
Hi Everyone,
It is not your duty to fix their mistakes.
If you want to stick with the Vector 3 piece of carp, that’s your prerogative.
If you want to salvage it, it’s a lot of tat for £900.
I cannot twist your arm to join me.
Hopefully, if you do come along for the ride, you were wise enough to keep all correspondence with Eaglemoss and Dbfactory and recorded every telephone conversation.
I personally have taken names, position in company, and digitally recorded every telephone conversation for the last 33 year’s.
I am not like any typical Englishman, letting it slide, I am very much American in that, I complain, claim and offer praise where it’s due.
You’re not alone if you would like redress for any situation. If it’s offered, use it because, you’re guaranteed someone will have their Ten Penneth out of you!
Another option is to go to your bank and ask for a draw back of funds. Banks are very good at this type of thing.
If like me, you paid with a credit card maybe, a claim lodged with them.
There is so much legislation these days geared for consumer rights protection.
Hey! If you don’t ask, you don’t get cliché, nearly always works.
I still want redress through the courts, don’t you?
Kind Regards
Andrew
[post deleted per user request]
I get the same problem with the print head sliding to the left and the bad vibration/drilling noise which I was told by the IT geeks to send photos or a video,not sure what a photo will do lol .My reply to that was even if I did send a video it still won’t fix the software problem .I got a reply today saying they are updating the software soon and they will let me know soon
Hi I have just completed my 3d printer from Eaglemoss It was hard to calibrate but found best to use a larger object rather than the 02mm gauge say 75mm high with the build plate at a lower level then when level raise the plate until reaching the 02mm gap This made it much better to level the plate the only problem I have is the bed plate will not heat I have resolved this problem by getting PLA from Rigid ink. I now get very good results as Rigid ink PLA will stick to a cold bed.
I would add that getting the bed plate level and at the right distance from the extrude is very hard.
Hi i had the same problem but then found i had fitted the brackets on the wrong side instead of between the fan and block this raised the fan blower but the clearance is very small and i did need to bend the brackets a little but all works fine now
Guys I think this is due to the limit switch not being pushed in fully when it moves to the egde
Is anyone having any problems with grub screws coming loose after a few prints? which then causes the printing to go out of line and I wondered if anyone had any solutions for that? I am thinking metal glue
.
[post deleted per user request]
Well i have fixed it by removing the bottom screw of the plastic plate/grip that holds the limit switch in place. Pushinh it as far right as possible and glueing it in place. Its just because its about 1mm out. You can test it by moving the x-axis left and right to make sure the limit switch clicks when it reaches the end
Ive found you can buy grub screws online woth threaded locks to stop them coming undone with vibrations. Im guna give that ago if not threaded lock glue seems the way
I think this is what we are looking for. I have ordered some so I will soon find out.
Still having trouble with the printer and software,the damn thing still vibrates as the printer head tries to go further to the left than its supposed to and the software still doesn’t tall to the printer so nothing prints.I have emailed both the tech guys and Eaglemoss with very little in the way of a solution and I also tried calling both the v3 customer services and technical help and was on hold for 10 minutes on each so I gave up. A refund is what I want now as it’s turned what I thought would be a good project and product into a large paperweight.Rant over
[post deleted per user request]
Graham, the problem with the damn thing still vibrates as the printer head tries to go further to the left than its supposed to is a problem with the limit switch not being being pressed in fully, I put my fix below. You need to make sure it fully clicks as the print nozzle arm inside the metal case pushes the limit switch down.
If it is fully clicking and being hit every time and not being pushed back away then you will have a problem with the limit switch but either way thats what the limit switch is for and that is the reason, it is there to say " this is the end, stop moving in this direction "
Hi All
I know that some of us are having issues with this printer, however if you do manage to get it to work here are some tips.
Firstly forget the slicing system in the printers software just use it as a way to connect to your printer, send the g_codes.
download
Meshmixer at www.meshmixer.com
Slic3r at http://slic3r.org
Meshlab at http://meshlab.sourceforge.net
Now I use Meshmixer to add the support structure to the Model, Slic3r to generate the g_code then upload with 3d create and print.
now Meshlab I use to convert the sketchup file to stl as sometimes the sketchup plugin fails.
Here are the settings for PLA in Slic3r I use which seem to work.
In Print Settings
Layers & Perimeters
Layer Height 0.2
First layer Height 0.2
Perimeter 3
Solid layers top and bottom 3
Seam position random
Infill
Fill density between 25% and 80% depending how strong you want the Model
Fill Pattern Honeycomb
Top & Bottom Fill pattern Rectilinear
Combine every fill layer 1
Only when needed tick
Solid infill layer 3
Fill angle 45 degrees
Solid infill threshold 70 mm2
Infill before perimeter tick
Skirt And Brim
Loops 4
Distance from object 4
Skirt height 1
Minimum Extrusion length 0
Brim width 0
Support Material
Make sure it is not ticked as you will get better results from Meshmix do look on youtube for tutorials.
Speed
Perimeters 30
Small Perimeters 20
External Perimeters 15
Infill 50
Solid Infill 50
Top Solid Infill 50
Support Material 50
Support Material Interface 60
Bridges 60
Gap Fill 20
Travel 80
First Layer Speed 30
The rest of the settings make sure they are set to 0 except Max Print Speed set to 80
Multiple Extruders
Make sure the settings are set to 1 and the tick boxes are empty
Advanced
Make sure all settings are set to 0 except these settings
First Layer 200%
Infill Perimeter Overlap 20%
Bridge Flow Ratio 1
Threads 2
That’s all the setting for this section
Filament Settings
You need to set that according to the material you are using and the recommended settings**.**
Printer Settings
General
Bed Shape Rectangular
Size 140 X 140
Origin 0 0
Extruders 1
G-Code Flavor RepRap
Pressure Advance 0
Vibration Limit 0
Custom G Codes leave alone
Extruder 1
Nozzel Diameter 0.4
Extruder Offset 0 & 0
Length 1.5
Lift Z 0.5
Speed 20
Extra Length On Restart 0
Minimum travel after retraction 1.5
The two boxes not ticked
Length 10
Extra length on restart 0
This should set you up for printing
When you do load the G-code the printer will tell you the bed is heating , But it will not mention the print head. Just let it run.
Now as for the Printer
That square PCB build plate get shot of it as it is useless.
Get hold of some sheet Aluminum the same size as the PCB. Rough the surface with some 80 grit emery paper.
When you get ready to to print spray the Aluminum with cheap Hair Spray, this will help combat warping.
I have added a Photo of the results.
Do search for tutorials on the software packages I have mentioned, but ultimately get a better printer for half the price we had to pay for this thing.
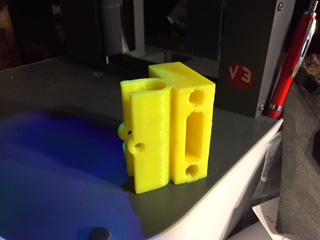
And guess what you can print with it ad the printer works to build cases to cover the electronics.
No sarcasm intended I done the same within two days of firing this v3 up
I have not been able to connect with the printer using repetier.
[post deleted per user request]
Yes please
Do any of you guys think the bed mount points need to be stronger ?
Thankyou
Will be glad to move away from the V3 Just rebuilding my Prusa I3 onto a 3mm Steel Frame.
Then I will Probably donate this V3 to My child’s School where Precision is not an issue.
I’m ever the optimist…
I had one great print from this printer two days ago, and I thought I had cracked it.
Mmmm not the case how wrong could I have been as the next few prints started to degrade, and I thought it was my settings.
Tonight I started a print to discover the bed was not positioning to where I had calibrated it so I went through the process again, and found it was significantly off.
After closer inspection of the z axis I found that it alters its position, and this is due to the flimsy construction. I should not be able to move the axis by hand by 10mm. No wonder every photo of prints show visible ghosting.
I do not know what the answer is for this one I think I shall have to either gut it for parts or use it as a door stop, but I cannot risk the print quality