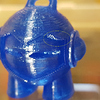
ok, so this is mostly NOT a bridging issue. There is not much bridging going on there.
The bridge is when plastic is stretched from one area to another. In this case, this is a print area where a section is printed, and the extruder turns. Next layer, the section is printed further, and the extruder turns.
Fiddling with bridging is fine, and may help some.
Here is another suggestion: Support material. Click the support icon, choose .1mm, then automatically generate support. (you may have to add some manual supports. In your support settings, choose .2mm offset. this will create a wisp of support in that area, that will easily come off.
But again, this is a cooling issue. Print several at a time.
Thanks for the info. I didn’t think it was really bridging but still learning!
I did print 2 at a time but go the same basic result. I have it pretty good for no support (thinking no support was a requirement for test). I have cooling maxed out and print as low as 500mm/min but back up to 1000mm/min seems to get the same result so sped up for time sake!
I’ll give your support suggestions a try to learn and see how it goes.
Thanks for your suggestion. I tried printing at a much lower speed and that didnt gave any result. First I go calibrate my printer and if that does not work I print 4 of them in 1 go to see what that gives. Let you know when its done.
For now I did the following things to make it better:
- Lower the temp 5 degrees (no result)
- Increased the retraction with .5 MM
- Next to my nozzle fan I added a desktop fan to bring more cooling (cleaner model, but still a brow on the left eye)
- Calibrated my layer width (no result)
- Slowed the printer from 3600 to 2800 (no result)
For now I am going to print 4 of them in 1 print and see if that makes it better. Though, I cannot imagine that it should be that you have to print more models to get a clean one… Somewhere, something is going wrong, but I have no clue what… I hope that anyone has some extra tips and tricks.
The reason many folks on this board have suggested multiple marvin prints at the same time is that effectively slows down the time between each layer, allowing the previous layer to cool and fully crystalize before the next layer is printed.
This is why I suggested you print it along with another item you are printing, or to print several of them.
It is a tried a true solution that has solved marvin issues in the past, and is a common solution when printing small parts. Inactive cooling.
I have tried 180 but not with the bed off. 180 for the PLA I am using is lower than it likes. The loop at the top will crumble if touched, like it crystalized. It doesn’t react this way when printed at a higher temp.
From what I can tell this issue is caused by the way the nozzle is coming off the print when the slicing is going on. I currently have an army of marvins laughing at me. Every print better than the other but ultimately i think this is an issue resolved in the slicer