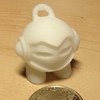
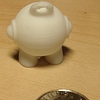
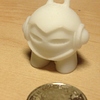
I was seeing this very thing on my FFCP and played around with many different settings. The problem I noticed was warping. The previous layer warped up and interfered with the current layer and marvin’s butt just looked flat. I also noticed the same problem under the ears and, to some extent, in the eyes as well.
The changes I made that helped the most are as follows (listed from least improvement to greatest):
1. Slowed down the print speed.
2. decreased the print temp as much as possible.
3. installed an active cooling fan (I am not sure if this is an option on your machine).
1 Like
Thanks, was that with ABS or PLA ?
Sorry for the omission. It was ABS
Thanks for the feedback, you’re correct this is not with UP! ABS (because its so damn expensive). I do however have some of the UP eom white ABS left so I will try with that tomorrow.
I do have the temp software mod and lowered the temperatures a bit and they seemed to print a bit better on the backside, see images on my hub page. I also tried one in each corner of the plate/mesh all at the same time on fine sped setting to see if it was a warping thing (heating element is on centre of plate, I have modded that from 50c to 90c for larger prints).
However there is always room for improvement  may I ask what ABS and/or PLA you use in your mini ? Always the UP filament or another that works well ? And where do you order from ?
i have had mixed success with PLA, the extruded can never grab the likes of faberdashery easily and always click click clicks at start of the print, have you found any pla that works well with it (if I start a job and feed it in at same time it works fine, but have to so this for each PLA print) again temps lower via the mod, the output is fine but its a pain in the rear.
Thanks James,
There is the option to print with doors open and a small desk fan blowing in there (the same as I do for PLA printing on this printer, having lowered temps with the software mod). I could also try a lower extrusion temp too. Also the print head has a selector for directing more air onto the print as it comes out which I presume will cool it quicker too, probably a good idea for Marv as he is so small.
I will give thrm all a try tomorrow and report back, thanks again.
You would get better answers over on the Up forums. http://pp3dp.com/forum
The problem with the Up is the software was designed to work with support so it does a poor job with bridging because it doesn’t know to print a little faster/cooler when bridging. Your biggest issue here is being too hot for your filament. If you search the Up forums there is a software hack to allow you to lower the printing temp. Alternately, if you prefer a hardware solution you can build my hardware mod for under $10 http://www.thingiverse.com/thing:528396
Once you have a temp mod you can print with or without support just like it is Up genuine filament.
While you don’t have a temp mod having the fan door open (handle in the up position) will also help but usually I don’t like to print that way for ABS as it will make bigger things than Marvin warp. Also printing on Fast will help that bridging but you will need to the fan open because those layers may not cool fast enough otherwise.
couldn’t wait till tomorrow !!
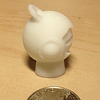
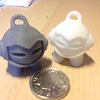
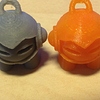
So printed with the OEM white, door open, lid open and fan switch on and a USB fan blasting in (same as I do PLA) results phenomenal…well at least I think so  I will now try the same with the non OEM silver and temp mod down to 230c and see if the outcome is as good
Your Marvin looks amazing! What fill setup, layer thickness and printing speed have you used?
I ordered black ABS from Ink Filament (http://www.3d-printerstore.ch/3D-Filament/3D-Filament-1-75-mm/ABS-Filament-1-75mm:::49\_51\_55.html?MODsid=vvs7thm41ne63s1l5gm5ih3ns2) and it worked really well without any change of the printer setup, even with door closed.
I’ve never tried PLA so far. I’m working with Mac so I can’t use the mod, so sad.
Let me know.
It was the UP abs filament, 0.2, standard temp settings, minimum fill, support base only, with raft add support for 10 degrees or more 3 surface layers.
i just found this youtube channel which seems great for material reviews so now in my favourites, he uses the up mini…
maybe you can get a cheap old laptop off ebay to use PC and hack for a very small amount…
Or just do a hardware mod for temp instead like a linked above. There is no point leaving the doors open for ABS as it doesn’t have a crazy low softening point like PLA. A little bit of fan coming through the wind barrier is enough if it needs help to firm up.
I looked at both hardware and software temp solutions, opted for the software one due to the level of customisation between layers too, the reason I printed with door open was because I have modded by board from the standard 50c to the 100c(but generally achieve 85-90c) so need to disperse that extra heat on small prints, I just have a USB fan that blows in and up and out the top (lid open) I modded the board because larger prints were warping at the edges with my up.
The mod for the hotter bed is to solder one of these in parallel to the one on the bottom of the hot plate, 5 min job Amazon.co.uk
The suggestion to do the hardware mod was in addition to your response to the Mac user.
Good you’ve done the bed heater mod - it’s essential but you do not need to open the doors. Your issue is not because the area around the print was too hot it is because the print was being printed too hot and not cooler fast enough. This is what the wind barrier is for. For ABS you want the surrounds as hot as possible… it does’t matter too much for your small print but it will for others. For PLA, you want the opposite with the surrounds and bed as cool as possible. Chances are you will struggle with PLA on any longer prints on a Mini anyway without serious cooling direct into the extruder.
I am just trying to help you out as an experienced Up user. I’ve only done nearly a thousand prints on my Ups (kid you not), helped a few thousand Up users with their print issues … if you want to take the advice it’s up to you.
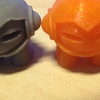
I think your black marv looks spot on !
I have now run the OEM white Marv as uploaded lastnight and today the silver Marv with extra cooling and tweaking temperatures a bit, I’m really happy with them. I am as we speak printing off an orange PLA version again temperatures tweaked through the s/w mod and a bit of rapeseed oil with the filament load(I have read it keeps PLA sweet in the Up! box, I did have an initial bit of clunking when it started but not since on the 20min print in fine mode all fans)
Hi Simon,
thanks for the help it is much appreciated, certainly didn’t mean to come across as disrespectful. I appreciate you taking the time to reply and help
Thanks again
You guys really should take the discussion to the PP3DP forum as there is a much better body of knowledge over there. 3DHubs tends to be full of old wives tales of other new users who suggest things like oiling up PLA to get it to work. At least on the PP3DP forums one of the experience users will jump in and tell you when stuff is a bad idea. I don’t get on their much myself any more as I got a little tired of the same questions for 3 years and i think I’ve done my time over there as the biggest poster … but it’s a good community, worth throwing your questions rather than here where you’ll get as much bad advice as good.
No offence taken … just trying to shortcut the convo by explaining I do have a decent chunk of experience. Have fun with your Mini.
Roller.
I have tried the PP3DP forums but they are rarely used, so many questions go unanswered and have found it’s weeks before anyone does reply, also a lot of the material on there is old, that said I found the software mod there so am happy and there is some useful stuff there. :-)) At least I got a reply here within a few hours that helped me resolve my problem, again, thanks to you and everyone else for the input.
I’m just onto my second PLA print with the temps modded, started extruding no problem…I feel like a kid at Christmas, my desk looks like it has been overtaken by minion/marvin invasion…
I did check there yesterday before here for an answer to my marvin problem but couldn’t find an answer.
1 Like
Oh that’s a shame. Maybe that’s because the three top posters and assistants there have all move to Zortrax printers. The body of knowledge there is very good though but the search is useless… use google search and direct it to the forum. Pretty much everything you would ask including the top post has been asked many hundreds of time before. I was going to do up a Wiki with a FAQ but we never managed to get around to it and for the first time my Up sits idle while my reprap and Zortrax get all the attention.
On PLA you shouldn’t have a problem until you get on to longer prints. Some Ups (Minis included) have more trouble than others simply because some extruder steppers run hotter which is the source of all the issues with PLA once you aren’t printing too close to the bed. On that latter point try to be sure you don’t get more than a click or too on PLA. These are the sound of missed steps due to back pressure … with PLA they will rip a bite out of the side of the filament and you have a jam. If you jam too many times clean out the extruder gear as the PLA powder stuck in the teeth acts as a lubricant making future issues more likely. Don’t ever use lubes or oils like suggested earlier … over the long term it will give you nothing but hassles and it’s a pain to recover from.
If your longer PLA prints are jamming google for the mods by Drew Petitclerc … he has a blower mod using a fishtanks pump which has pretty much a 100% success rate. Easier are some extra ducting and fans around the extruder to keep it cooler. The extruder in my Mini was beyond this help and I had to go to fish tank pumps until I made mod to drive the extruder gear through a belt to stop the thermal connection to the stepper. Anyway, Drew’s mods are on PP3DP forum and on thingiverse - the cooler and the drive gear pressure mod are the most useful. There are newer and easier alternatives but they are the best solutions for all cases.
cool thanks for the tips, I think you should do that wiki page I actually have an old pump laying around from one of those old tubes you know you used to put the water in a glass vertical tube and plastic fish and it blew air in to make the plastic fish rise and sink… I might look at putting it to good use using the mods you suggest.
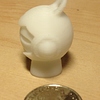
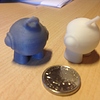
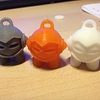
well here is the orange PLA (faberdashery) the first one didn’t print too well using standard UP temperatures, I changed the print temp to 230, the under extruding problem seems to have gone now but its just not quite as sharp on the bottom of Marvs helpmeet, its the only place I notice it really, grey and white are ABS ,PLA orange in the middle, welcome any thoughts on sharpening up the edge of the helmet in the PLA
You should eb able to go lower on that temp - 230C is more an ABS temp. Faberdashery stuff is usually a better grade of PLA so it would be on the higher end, like 210C. Just listen for a jam towards the first few minutes so you can catch it early if it’s too low and save yourself having to clean out PLA dust form the jam.
Other than that, front and top open of course and a fan direct on the print (wind barrier fan is not enough). If you can’t direct it well on to the print insulate/screen your hotend and nozzle as best you can. Forcing the hotend to work harder can result in more heat working up in to the top of the extruder.