Go into the Utilities menu on the printer, select Home Axes from the menu, see if it moves the carriage to the back right and stops against its switch and if the bed comes up and stops against its switch ok, if it does do that ok the bed will stay up, now back up in the menus and go to Build from SD and select your test print again, the bed will lower to the bottom and the carriage will go to the front left corner. Does it still make the noise with the bed when it goes down?
If so then it thinks its range of travel is larger then it should be BUT the switches are working since it was able to home the axes. The best bet now would be to connect it to the computer and run the makerbot desktop software and make sure the printer type is set to Rep 1 and then do a firmware update to the latest version, the makerbot desktop software will tell you how to do it just follow along. The current firmware version is 7.5, you can check this on your printer by selecting Info and Settings, then Version Number. Even if its 7.5 in there i would reflash the firmware because there is no telling what the new board was setup as, they could have the offsets wrong.
After the firmware update do the same test, home the axis, then select a print, does the bed work ok now? If it doesn’t the next steps would be to check the Z axis stop switch, top middle of back of the printer, If the switch is set to low then it will trigger that switch and still think it can do down farther then it can, moving the switch up moves up the lower stop position. On mine and most of the ones i worked on the the switch was attached with two screws to the vertical slots, there is other holes to make the switch a fixed position and thats how they generally came from the factory, but by moving the switch to the slots you can control the stop point by moving the switch up. It sounds like its trying to keep going down when it physically can’t. The reason for this is after it taps the switch it knows it can do down X amount of steps before hitting the end of the travel, if the switch is too low it will still think it can keep going.
As for the carriage for the extruder not making it all the way home, did it go all the way back but not all the way to the right? This is a common problem due to interference between the stepper motor wires and the X axis stop switch located on the right end of the gantry. The X axis motor and the X axis stop switch wires go down the hole in the front right corner, to alleviate this problem what most people do, myself included, is move the X axis stepper motor wiring to the back right corner hole along with the Y axis stepper motor wiring so only the X axis stop switch wiring is going down the front right corner, this gives them some separation and keeps down on the crosstalk between the wires.
I could not upload new firmware. I select the replicator 1 single/dual, and try sailfish 7.7 but it always says “upload failed”. Now ever since I have tried this, my replicator is unable to print again.
When I print from SD, it heats up fine, and then it goes to the front left position, but it tries to move too far forward and makes a jolting noise, then gives up and moves back to the *near home axes. It is like the replicator pauses the print, moves the carriage back all the way in the y direction and part of the way to right (x axes right?) but not all the way home. And when I resume the print, same problem. The jolting of the carriage continues. EDIT: I FOUND THE P-STOP OVERRIDE AND I TURNED I OFF. I NO LONGER GET THE CARRIAGE JOLTING ALL THE TIME (STILL HAPPENS OCCASIONALLY. THIS IS ALL WITH THE MIGHTYBOARD FIRMWARE THAT CAME INSTALLED ON THE BOARD)
**NOTE: the bed problem of it trying to go further down than it can has mysteriously gone away and has been replaced by the carriage issue I mentioned.
I am proving to be quite amateur with all this, but I am determined to get it right!
Ok i would stay well away from Sailfish 7.7, i tried that on my Makerbot and had NOTHING BUT issues. The current official Makerbot firmware is 7.5.
It sounds like your Y Axis offset is still wrong, so it goes forward and mechanically it crashes and can’t move farther then it gets all confused, if you look on that page that you linked to… Step 1 Before you install Sailfish, you need to gather the home offsets, but since yours were likely wrong in the first place that won’t be of any help!
Go download the Makerbot Desktop if you don’t already have it and do a firmware upgrade to 7.5 from there first, then if you really want to go to the latest Sailfish you can get the correct offsets. If Makerbot Desktop refuses to install the firmware get ReplicatorG as it can also reinstall the firmware, i assume thats what you used to attempt to install 7.7? ReplicatorG can install the older versions as well.
On the older Rep 1’s it can take a few tries to get the timing right of pressing the reset button in the back during the firmware upgrade process with ReplicatorG or Makerbot Desktop, there is a modification to fix this but it requires soldering on a small capacitor to a location on the board.
If you use Home Axes in the menu though does it properly home all the way to the Right on the X Axis? It still sounds like a offset problem in the firmware rather then mechanical at this point, but just to verify that try this…
Turn the printer off…
Move the X axis by hand all the way to the right so it stops on the switch
Move the Y axis by hand all the way to the back so it stops on the switch
Turn the printer on
Select Home Axes again in the menu
It should shouldn’t move X or Y at all and raise the bed until it contacts the switch, now select Print from SD card, does it still crash to the front left and keep trying to move the Y? If so then its the offsets in the firmware and not a hardware issue! Which is good, you just need to get the right firmware in there and you should be ok.
Move the X axis by hand all the way to the right so it stops on the switch
Move the Y axis by hand all the way to the back so it stops on the switch
Turn the printer on
Select Home Axes again in the menu
It should shouldn’t move X or Y at all and raise the bed until it contacts the switch, now select Print from SD card, does it still crash to the front left and keep trying to move the Y? If so then its the offsets in the firmware and not a hardware issue! Which is good, you just need to get the right firmware in there and you should be ok.]]]
Ok good news, the carriage does not crash when I followed the above instructions.
Bad news is the “update firmware” option in the pulldown menu of my makeware is greyed out. It says I am connected to a replicator 1 and that the background services are running. I tried restarting services and that didn’t change any of the conditions.
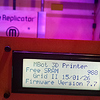
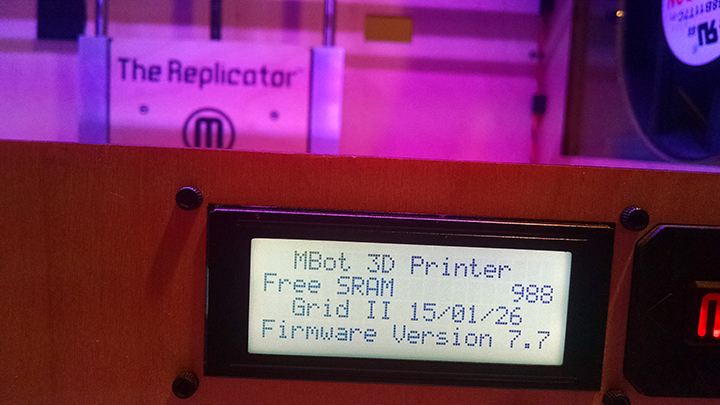
I attached some images of my current firmware. As for an error it simply says “upgrade failed” and says I can try again. So I do, and it is starting to get frustrating!
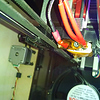
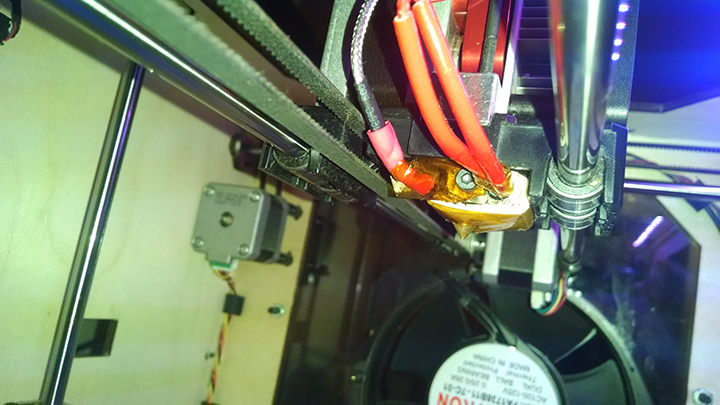
I also attached images of my wiring layout (which seems wrong, but I couldn’t really fit it another way. It Does twist the thermocouple wire quite a bit, so I am wondering if that part is now busted.
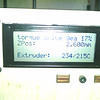
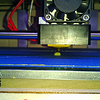
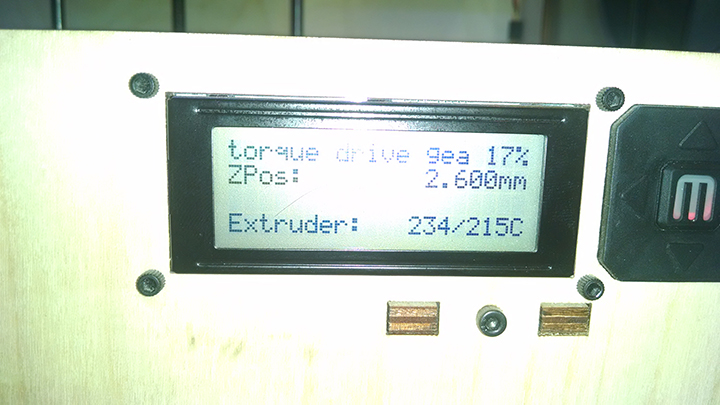
In addition, I also attached an image of how when i’m printing, the nozzle/heaterblock is smoking because the temperature is going up to 230-something while I print. BTW I did wrap the thermocouple completely in the kapton tape I have, and there has been no improvement.
ALSO, when I pause a print, and restart it, it does not continue the print in the same spot. So that tells me something other than the heat is still off.
Ok if i had to guess, its the 7.7 you have in there. I know guys will try and say different on here, but i tried 7.7 on my Rep 1 and it was NOTHING but problems. You also mentioned that it won’t pause and continue in the same spot, i had similar issues with 7.7, it was just totally unreliable, missing steps, jittery stepper motors, lots of weird movements, it was a friggin NIGHTMARE. So i went back to Makerbot’s 7.5 firmware and everything just smoothed right out.
Your going to be burning off stuff at that temp, so no surprise its smoking. At this point i think a replacement thermocouple would be a good test to rule it out, however, the fact that its set to 215 and its at like 234 it should be tripping the overheat warning, normally what i would see if they overshoot that badly is a message that says something like “my temp readings are failing please check the wiring” etc. Apparently the 7.7 firmware doesn’t have any safety cutoffs to it?
Ok for the firmware problem, use replicatorG and get the factory 7.5 firmware, then before you try it, open just Makerbot Desktop and click on Services then Stop Background Services, confirm anything that pops up, then Close Makerbot Desktop. Then open RepG and try the firmware upgrade and select the 7.5 version of stock makerbot firmware for the rep 1. Now the trick is, getting the reset button press on the back at JUST the right time. Sometimes i find if you click the reset button on the printer with one hand while clicking the button on the software with the other hand at the same time works, sometimes you have to tap reset on the printer then click the button a second or so after, it varies. This is why i modified my mainboard, it involves adding a capacitor to the motherboard to enable the auto reset so you don’t have to click the button on the back anymore when doing a firmware upgrade.
I did some digging through my backups tonight and i found my copy of WinBotTool and a hex file of the 7.5 makerbot firmware, i had to do a recovery on one a while back. If your still having issues with this let me know, i can upload these files to my webserver and send you a link. The WinBotTool is VERY easy to use, all you have to do is stop the background services in Makerware, close it, then run the WinBotTool select the firmware file, and it will tell you to turn the printer off, click ok on the box that is up, then turn the printer back on, and it starts writing the firmware. I just tested it today on another printer i’m working on, took the update the first try.
That sounds like a great idea! I tried again another 15 times, I feel like I am going insane with this to be honest. I even looked into new printers today. But I would be willing to try the WinBotTool route if you are willing to send me the link.
I’ve done this as well, a couple things to add. You can desolder the power connector from your old Makerbot board and solder it into the GeeeTech board, just desolder and remove the screw terminal block they put on them, then you can continue using the stock power supply without chopping any wires or worrying about polarity etc.
The power switch lines up perfectly, no mods needed there. I didn’t make any hole for the micro sd card slot to be used, really no reason to as its not needed for anything, in fact most of us that have done this repair removed the micro sd slot from the board to prevent it becoming a noise ingress source to the processor since its close to the Z-axis and where most of the wiring is going out the back to the steppers on the extruders. Other then that and the stepper driver mods its pretty much a plug and play replacement.
You can also desolder the stepper motor screw terminals off the Geeetech board and replace them with the original headers off the Makerbot board so you don’t need to chop your stepper motor cables. I just modified the board rather then having to modify any of the wiring, all the parts on the Makerbot board will drop right into the Geeetech board, they just went with more universal screw terminal blocks to keep it cheap.
I would offer to look at your old board to see if it can be repaired.
Are you still repair Mightyboards?
I have two Rep1 - one is working quite good but one is broken.
I have here also two Mightyboards rev. E which seem to have the broken/popped Voltage regulator.