try lowering the temp to around 210 and lowering the fan speed (or unplugging it). I’ve seen some problems caused by the fan blowing the filament off its target and this makes it low quality. Lower layer heights need way less cooling. And when you think about it the smaller stand is much easier to blow off course. Finding a temp setting that cools while not distorting the shape can take some work. I use simplify 3D but in maker-ware you have to make a custom profile in text editor!!
Have you tried printing out 3 at a time? That may help.
Just biy Simplify3D and you’d be amazed what your replicator can pull out
Sharon
February 11, 2015, 6:55pm
18
If they had an eval or test drive I would love to try it out…
Its looks like an expensive version of slic3r… Since there is no free trial I am very suspicious.
yes, but it’s worth it. I did prints with 50 micron layer heights on my Rep2 with it…
I run into a problem where i had to print basically a large 4cm in height cylinder with hundred small circular holes. No slicer would slice it in a day (!), send an email to them and they replied that S3D sliced it in seconds. I was sold immediately.
Really, read some reviews. Watch some youtube…
Once you use it you will know what you are paying for. I could not be in business without Simplify 3D. It’s at least 10x better than slic3r in my opinion.
As I was getting started with my 2X, I found ( @45 seconds of this video) the rods were not fully engaged into the bodies.during this process, I also ‘cracked loose’ all the structural screws on the main box itself.If the box is tilted and or out of alignments during initial assembly, nothing will line up properly. My square that I use is verified @ .0004" in 8", so that’s plenty accurate. I uset the square directly on the base plate, and checked all the verticals, and sequencially tightened ( like an engine block/ head tightening process, inspecting each vertical as went along. when that is complete, then move to the gantry duties. on my marvin pics I have my first bahamut print, @ .2 res to compare.
Yeah, extra help would be appreciated, the entire gantry fell during shipping.
Rhluttrell@rocketmail.com
Sharon
February 11, 2015, 9:40pm
25
Anybody have a source for an Aluminum Extruder Block upgrade for a Rep 2X (I need left and right)? The place on eBay where I got them for my Rep 2 seems to have gone offline. If you have a better suggestion for the 2X I would love to hear your experiences.
This is the one I had wanted (scroll down on the listing)
http://www.ebay.com/itm/111566069212
Thanks!
For the past year I’ve been sticking prints well with Kapton tape from ebay and wiping the build plate every build with denatured alcohol. I’ve tried acetone without any benefit beyond alcohol, and acetone stinks anyway. the first couple tape application were stressful but now I have fine system that works great by having two pencils at two edges that I hold taunt during the process.
wayne
February 12, 2015, 8:40am
27
Based on info on the excellent (but now defunct) Makerbot Operators google group, I bought the Rep2 version of this http://devilsinthedetails.ca
It supports Rep2X too, I’m happy with it, although I’ve not managed to get ninjaflex to extrude yet, need to use the alternate spring I think.
wayne
February 12, 2015, 8:48am
28
Personally, I think it’s awesome, and well worth it, it does have some quirks and takes time to get settings ‘dialled’ in.
Being able to manually place support material in the GUI is a great feature.
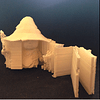
The automatic support material generation is kinda cool too; it kinds generates a concertina that can be easily removed(see attached)
The slicer is *fast*, it is multi-threaded so uses all your CPU cores.
wayne
February 12, 2015, 8:51am
29
Have you asked them directly? You might want to try.
wayne
February 12, 2015, 8:52am
30
Hi, where did you get the green panels from?
wayne
February 12, 2015, 8:57am
31
wayne
February 12, 2015, 9:13am
32
The attached guide also has some tips and nice exploded block diagrams. (I can’t find the original link, but the document is in the public domain)Makerbot Replicator 2 Guide Public Edition.pdf (1.23 MB)
While the article says you should level the build plate, I found that the out-of-the-box method is far from accurate. To get a truly level build plate, I haven’t found anything better than an incredibly thin leveling test print ( Leveling Test Print by DamianGto - Thingiverse ) and a dial indicator rigged up on the X rails with some magnets ( Replicator Bed Level Jig by phineasjw - Thingiverse )
Print once, find the point where the print came out the best, set that as your zero on your dial indicator, and then adjust the build plate until everywhere has the same reading. Repeat the process to either verify it’s level and set to the right height, or to find out how you might need to tweak the calibration, oooooorr… discover your build plate is warped in one corner and settle for not printing on that side until you get a glass build plate.
Amen on the test print for leveling. However my thingiverse print only takes 2 minutes to print. Its set to only do hatching at corners and over each spring adjustments. Thing 80227 waste alot of material and time. Yes, I’ve found that the best leveling leaves the back left corner as an area to avoid. (or minimize with a raft)