Hi guys, have you ever wanted to design and make your own bike?
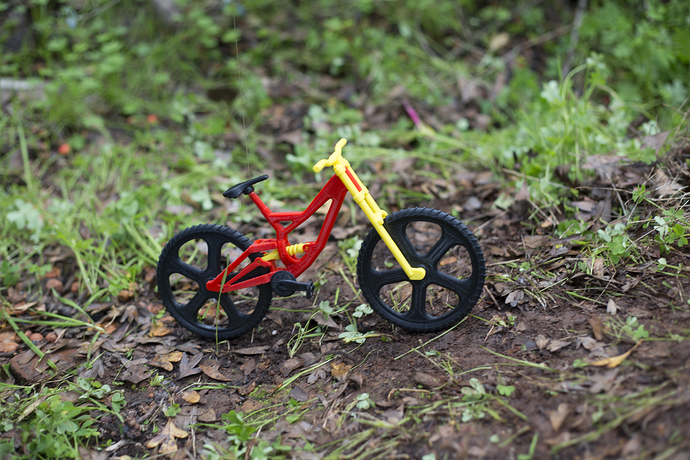
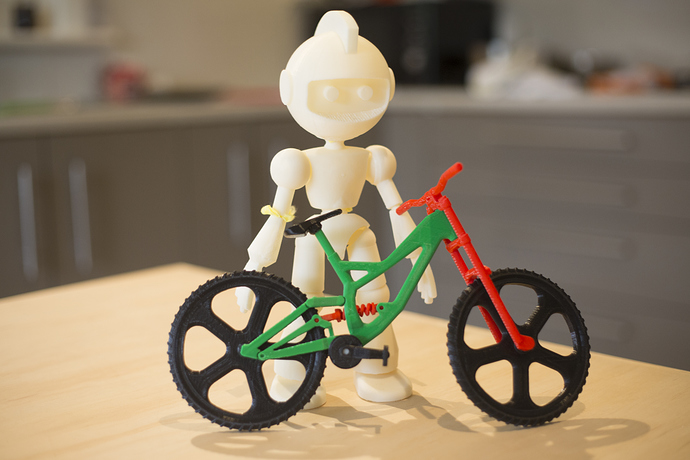
Well I have and until 3D printing came along it seemed like only a pipe dream but now it’s possible! I thought I would share the story of how I (and a colleague Alan) created and printed a downhill mountain bike with working wheels and rear suspension using only ABS (no flexible filament was used at all).
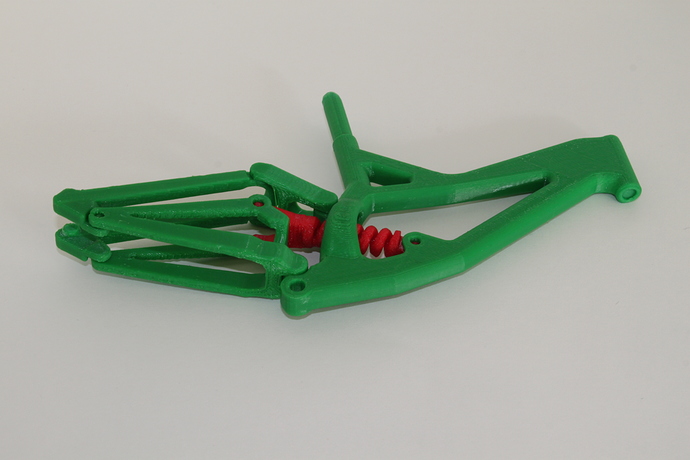
I was heavily into mountain biking when I was younger and so when I got my first 3D printer last year one of the first things I thought of printing was a bike. But work and other things got in the way so I only got around to it this year. I had printed a few springs in ABS so I knew I could get the suspension working if I could get the linkage working and make it printable. I really wanted to make it semi functional because I didn’t like the idea of having a bike that looked great but wasn’t capable of doing anything.
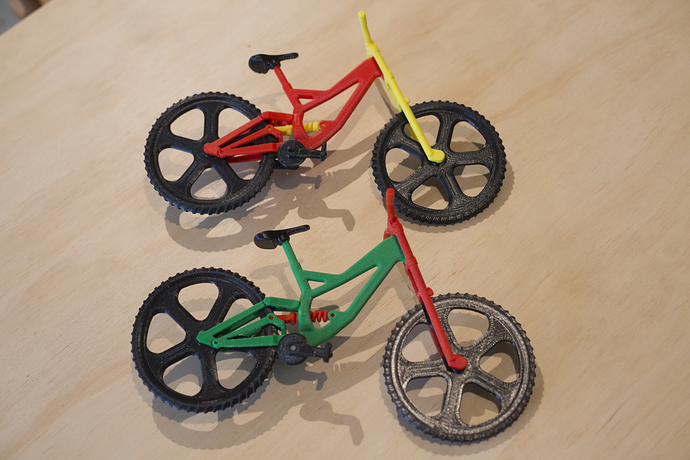
I designed the spring and suspension and sent the drawings to Alan (a colleague in the UK) who did the detailed design for me. Then once he sent the design back I had to modify the tolerances and just make a few tweaks here and there to make it 3D printable and to ensure all the snap fits were working. The yellow and red bike is the first prototype and fit together well but did not function as nicely as I would have liked so the green and red design is the second prototype which works much better and fits together great.
I also created a stop motion video of the bike in ‘action’ at our local mountain bike trail, the link to the youtube video is here if you are interested:
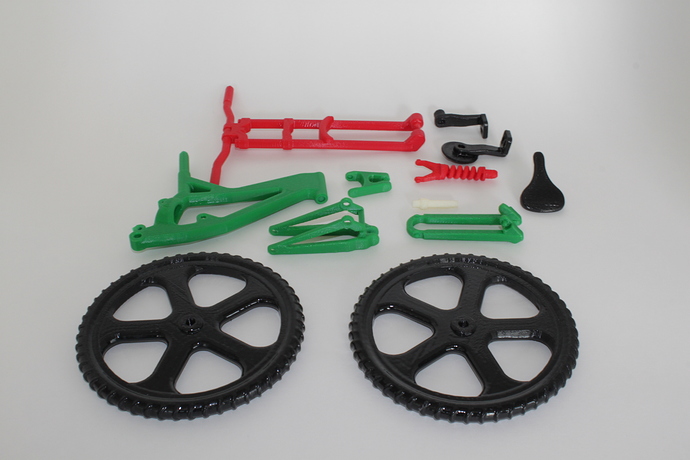
I printed it all in ABS (no flexible filament was used) on a Makerbot Replicator 2X, most of the components were done in 2 layers with 10% infill but the spring was 20% (it ended up probably being much higher because the spring was relatively small). I used pretty much standard ABS settings and printer settings but I do run a higher printed bed temperature of 120C to reduce warping of the ABS. All parts were printed with a raft to reduce warping and some were printed with supports. I also put all the parts into an acetone vapour bath to get a smoother and shinier finish. The total print time of all the parts would be approximately 7 hours.
The design is free to download and print from the Trinpy website http://www.trinpy.com/models/miniature-downhill-bike/ A short video of the working bike can be found at the trinpy facebook page (I can’t figure out how to upload videos) https://www.facebook.com/trinpy
I hope you guys like it and if you have any comments or questions then please let me know in the comments.
Cheers
Andrew
7 Likes
Love this, Andrew! Great stuff 
Clean parts. Did you use HIPS for support material?
Hi @Emma_4
No I just used ABS as the support material, and then used an acetone vapour bath for some smoothing afterwards. The pictures of the parts and frame by themselves were after I did the smoothing the rest were before the smoothing. I am having trouble getting my HIPS to stick to the print bed, need to do some more experimenting with that.
Cheers
Andrew
Cool.
Tips ps on the HIPS that I just learned:
kapton tape
light sand
purple Elmer stick glue
1 Like
Ok cheers I will try it out.
Thanks
Andrew
have you this file online so we can download it …sorry to busy looking at the pics i missed the link you posted This looks fantastic .Wayne
Love this! Can’t wait to try it! How big is the model in the images?
Thanks @DeKam, it is about 300mm (12 inches) long by 170mm high (7 inches). The trickiest bit is the spring which I printed with 20% infill, apart from that i should be good. Let me know how you go if you print it, I would love to see how others get on with it.
Cheers
Andrew
Hi Wayne,
Yes it is up on the website Trinpy for download, link is here https://www.trinpy.com/models/miniature-downhill-bike/ there are also videos of it working on the facebook page http://www.facebook.com/trinpy
The only real tricky part with the printing is the spring, I print it horizontal with 20% infill and it usually comes out nice, then you have to carefully remove the supports.
Cheers
Andrew
1 Like
Yedna
14
Hey, I’ve downloaded this print and tried to print it using PLA, which is a corn based plastic but 10 minutes into the print, the extruder starts going wack and screwing up the print. I assume this is probably a problem with my printer, but could it also be the fact that i’m not using ABS? Let me know.
Thanks. Ande
Hi Ande,
Sounds like a problem with the printer, the only difference between printing this design in PLA or ABS is the tolerances of the linkages and moving parts. Have you done any other prints in PLA? And did they print fine?
Regards
Andrew
Yedna
16
I was able to get the print working, it ended up just being a problem with the filament I was using. I first tried a sparkly black but it didn’t work, so I switched over to straight black, and it is printing fine.
Yedna
17
I was able to get the print working, it ended up just being a problem with the filament I was using. I first tried a sparkly black but it didn’t work, so I switched over to straight black, and it is printing fine.
Ah that’s good (about the design now working not the dodgy filament haha). Let me know when it’s done, I’d love to see pictures of another completed bike!