


Welcome back! In this series I will explore the potential of recycling household plastic waste into homemade 3D printing filament.
In the 10first post 10 10I looked into the different reasons for making your own recycled filament. So now that you’re all fired up to start cranking up production, let’s look at how to get things moving .
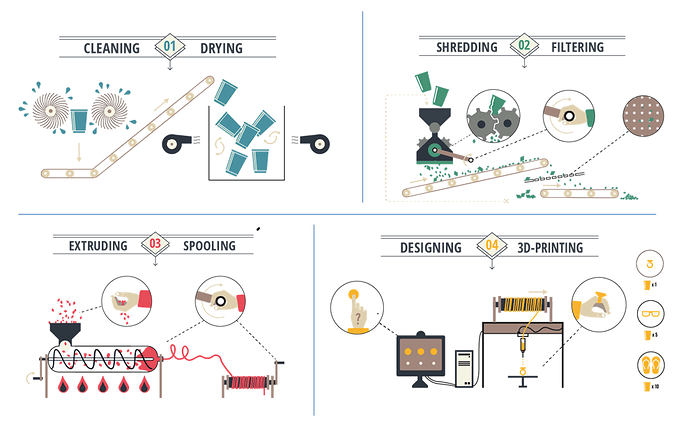
The process of local recycling consists of 4 main steps:
- Collecting and cleaning
- Shredding
- Extruding
- Printing
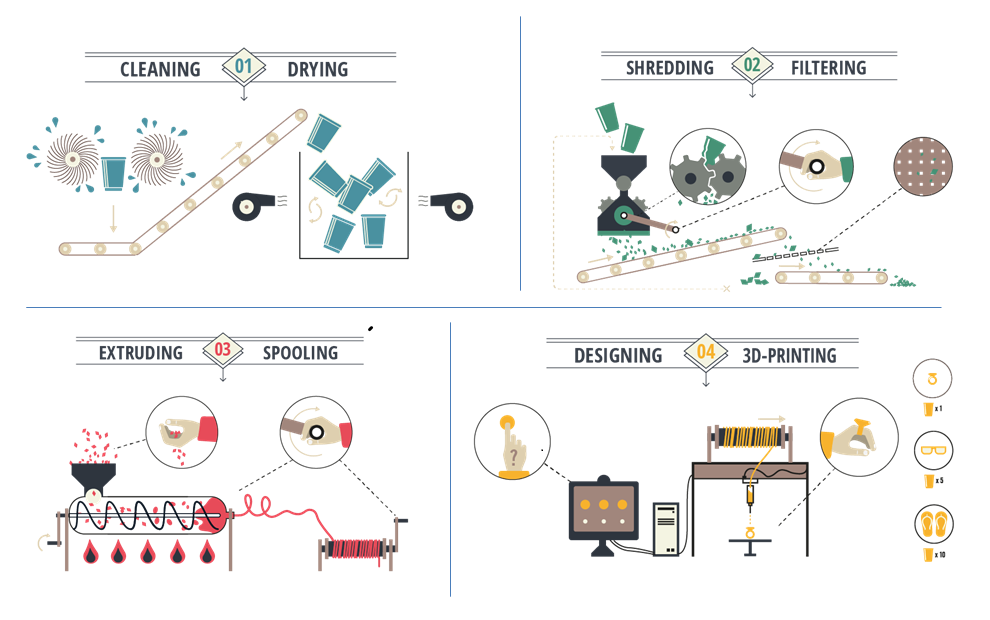
(Source: Better Future Factory, design by Studio Dolour)
The objective is to produce filament that will flow easily through your printer. Therefore it is important that the diameter and weight of the filament is consistent throughout the filament. Diameter inconsistency can cause different problems when printing:
- When it’s too thick it won’t fit through the feed tube/extruder head
- When it’s too thin it won’t be properly pushed forward because the gears can’t grip it.
- When it’s too thick too much filament will be used when printing causing blobs in your print
- When it’s too thin not enough filament will be used when printing which can create weak spots or even holes in your print
Weight consistency is important because it can reflect the consistency of the diameter of the filament and in this way serves as an indirect quality indicator. It can also point directly at the issue of different types of materials mixed in the filament. This can cause all sorts of troubles when printing because of the different material characteristics. If one material has a higher melting point for instance it might not melt properly causing lumps in the filament that can end up in the print or even worse can plug up your printer.
But not to worry, I have done some research and will provide full insight into which elements to control soon. For now it is good to mention that the diameter of the filament is by far the most important parameter. The way to keep this as constant as possible is by ensuring that the pull on the filament when extruding it is constant.
So what does the process look like?
Our friends from the Better Future Factory have made a great video that shows all steps of the recycling process:
https://www.youtube.com/watch?v=dIq3kwRVFqk 2
Step 1: Collecting material
It is very important to use a single type of material (plastic) for making new filament. Thus make sure to separate your waste before hand. The 2 most commonly used plastics for 3D printing, ABS and PLA, have very different characteristics, melting point for example, which if combined can cause serious problems later on in the proces.
Two different pieces of ABS might also not be the same. First, from a chemical perspective there are many different polymer types that are gathered under the name ABS. Second, the way the material was processed the first time around can influence the way it behaves when recycled. Especially the print temperature of the first round is expected to play a role since a higher temperature means more polymer chains have been broken down which results in a weaker material. However other aspects such as the infill percentage and layer height might also play a role. So when recycling old prints in general it is a good strategy to use old prints that are as similar as possible.
Other things to watch are that the material is dry, clean and not too old. Dry because water (especially in PLA) can cause problems when it is heated and the water starts to cook. This can cause bubbles to form in the material which causes the filament/print to be porous. Clean, because dirt etc. can cause plugging of the printer or can end up in the filament/print your producing. Caution should be taken with old prints because ABS and PLA react with air and degrade as a result of this. Especially for PLA this can have a pretty big influence.
This all holds for recycling your old prints but it works just the same for new ABS or PLA pellets that can also be used to make filament. So, when buying new pellets at least make sure to look for pellets that are 100% pure ABS or PLA. Also a supplier of pellets specifically made for the purpose of using it for 3D printing such as Colorfabb might give better results than ‘normal’ pellets.
Step 2: Shredding
The next step is to shred the material into smaller pieces. This is done first of all to be able to fit the parts into your shredder. Also the more equally sized the pieces are that you feed into your extruder the more consistent the filament that comes out will be. Basically shredding can be done in whatever way you like as long as the material is made into sufficiently small pieces. I myself use the Filamaker, a shredder produced by Marcus Senicky.
How small the pieces should be depends on your extruder but our guess is that smaller is better. At this point, I expect that more homogeneous parts will probably extrude better. So, also for shredding, I try to keep “consistency” as a general rule.
Step 3: Extruding
In this step the filament is actually made. This is done using a machine that is called an extruder. At this moment there are several extruders available that are easy to use at home and with Kickstarter projects popping up regularly it is expected this will only increase. My next post will go into detail on this but for now let’s look quickly at the way these machines work. The basics are the same for all extruders and come down to this. The shredded material or the pellets are fed into a ‘hopper’ which is basically the mouth of the machine. Then they fall into a screw that spins them forward and passes the material past heating elements which melt the plastic. After the plastic is sufficiently melted it is pressed through a nozzle that, if all goes well, presses it out into a perfect string of filament. The next series of posts will be all about how to do this and what results I was able to get. To get the picture check out the first part if this youtube video:
Step 4: Printing
The last step which of course is the main goal of it all is to use your material to actually print some awesome stuff. In a later series of posts I will look more into how that can best be done and if there are differences compared to ‘normal’ 3D Printing.
So that’s an overview of the steps to take to turn your old print into a new one. In my next post I will give an overview of the shredders and extruders that you can use to make this happen!
created
Jul '15last reply
Jul '15- 11
replies
- 4.1k
views
- 4
users
- 16
likes
- 4
links