Hello Friends,

I am stumped on this one. Can anyone tell me how to adjust the slice settings (FlashPrint) to make this print look better?

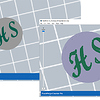
Here are the settings and attached screen shot shows the ruff slice preview.

How can I make this print clear?

Big thanks to anyone that can figure this out!

Printing: ABS
Machine: FlashForge Creator Pro

Layer height: .27m
Shells -
Perimeter: 2
Top Solid: 4
Bottom Solid: 4
Infill 15%
Speed: 40mm/s
Extruder Temperature: 240

2 Likes

Lower your Layer Height to around .15 to .18.

60mm per second recommended

I think you will find it is in the Layer height settings .27 is very rough finish for a start,

Hope this helps.

Looks like your detail is too small for your nozzle diameter what are the dimensions of the part. Not much you can do except try specifying a smaller nozzle diameter (once smaller than the actual size of the print quality will suffer dramatically).

A lower layer height might help when using a “smaller” nozzle width.

I would run the file through a fixer such as makeprintable to see what it finds but depending on the size of the model it may just be to small for your setup.

You might drop layer height to .2 but with ABS I probably wouldn’t go below until you have settings really working good and that won’t change how the preview looks.

Try changing the extrusion width to .39 or a little less (assuming you have a .4 nozzle) and see if the preview is better. If it is then that will tell you the detail is small.

I can look at the file if you want to post it.

the high layer height wouldnt cause the problems seen in the image though

6 Likes

Whats the size of your nozzle? Whats the size of the print?

6 Likes

try printing standing on side. Layer height is smaller than extrusion width

Print is 3/4 inch

Nozzle that came with the machine .4

It should be much clearer, I print other things this size good quality with Replicator G but I need Dual color on this and want to get it right on FlashPrint. I looked at all settings and can’t see a difference.

The part is 3/4 inch.

Nozzle - .4

I don’t see a nozzle setting in FLashForge. But that’s the physical nozzle size

Yea bro i can help u out

First off i suggest using replicator G for the flash forge creator pro, it works really well, i have the same 3d printer and it works amazing. If u want help from to trying to get it to work with this program we should skype so i can help you. If you want to my skype is, jadentheengineer. Talk to you soon

Need to print it flat for strength

Thank you, Replicator G is Much better. However, I need to do dual color prints and it seems more feasible in FlashPrint. The help is Much appreciated though!

Yes, i do agree that duel extrusion is much easier but if you want a good quality slice i suggest that you use replicator g, if you look in the instruction manuel, it showes you how to duel extrude on replicator g.

Make sure you are on the latest version of Flashprint.

What firmware version is on the printer? 7.8 is the latest.

I’d say that the nozzle you are using is way to thick for the letters. Have you tried with a 0.25 nozzle?

I am using the latest: http://www.flashforge.com/3-14-0-flashprint-release-note/

To explain further, your nozzle cannot lay down a thread very well that is less than the nozzle size.

So if you have a part of your text there that is 1mm, and you are extruding .4mm, flashprint is going to leave a .2mm gap in your letter.

Likewise, if you have a part that is 1.8mm, and you print two shells, flashprint is going to print the two shells, and flashprint is going to leave a .2mm gap in your letter.

Cura, and some other slicers will force material in there, in effect compensating for that section.

S3D and Flashprint do not do this.

So if you have a part of your model that is 1.8mm, and you are printing at .4mm, and you use one shell, your software will print the outside shell, and then run fill into the inside. So it is all about how thick the “wall” is. For tiny walls, multipliers of your nozzle size print best. You can see examples in the knowledge base.

Now I am not taking into account other things here. With S3D, you can run horizontal compensation here, and add .1mm or so to get it to fill in. Or you can mess with changing your nozzle size (in the software) or extrusion multiplier a little, which will extrude a little more plastic, possibly filling in the missing material by squishing it in there. This will affect the quality of an otherwise perfectly dialed in print, however, as it might cause overextrusion in other parts of the model.

While it is true that you print small details like this successfully in the past, you just have not hit this exact math on a shape like this before, probably.

Depending upon the needed accuracy of the print, another thing you can do if Flashprint is not cooperating is laying down two models, and moving one over by .1mm or so, and then printing. This will make your print off round slightly, so may not be an option.

But long story short, you have to fiddle to get your nozzle to go into that open spot, and your slicer software can’t see how to do it without your help.