


I got the same unit, but a little newer one with two extruders. I have yet to get anything printed because all of the problems I am having with the bed not heating and the buttons on the front constantly sticking among a dozen other issues. Note: Mine did not include the filament tubes that guide the filament to the extruders. I was told that they were having issues with them causing the extruder to clog up a lot. My suggestion is to remove those and feed the filament directly through the whole like I did mine. It seems to flow well when I load filament.
Skip to main content
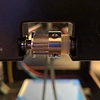
I actually got tired of unclogging the tubing and replacing them so I actually replaced the hot ends completely… I also swapped all those cheap plastic pulleys out. Take a look at my pics. Note: Some pictures are before switched to Bowden. Before I switched was using a custom direct drive j-mount bracket which I remixed.


I posted a detailed response to you below.
Thanks Man!
Also, you will need (Quantity: 8x) GT2 Timing Pulley 17 Tooth Pulleys w/ 5mm Bore and you can get them on eBay from China in packs of 10, just make sure it has 17 Teeth… I tried a few variations without success, it would appear I need to change firmware parameters for drastic changes.
The bearings on the X-Axis pulley also go bad right away and generate a clicking sound while printing, you WILL need to replace these and it’s a pretty simple task to do, I suggest you replace them when you swap out the pulleys. These are the bearings that you will need (Quantity: 2x) 5 x 8 x 2.5mm Metal Shielded Flanged Bearings.
The linear bearings / bushings were purchased here: www.ebay.com/itm/252011586572?_trksid=p2057872.m2749.l2649&ssPageName=STRK%3AMEBIDX%3AIT
Well here is the thing, it will clog my nozzle then I have to back the filament out and cut the little nub that formed at the end off and that will fix it, so if it’s getting too hot you suspect that is what is creating that little thing?
Yes it has a heated, glass bead. (glass over heated bed element with z-stop adjustments)
I am pretty new to 3D printing to be honest and this is my first printer, I have been pretty much learning as I go along. I am positive that my firmware is giving me trouble but I have yet to find anyone who has done the upgrade on a CTC and managed to correct the weird little quirks it’s introduced like the head running off the build plate during the print start. I assume it’s an offset somewhere…
I have reduced my speed a great deal but I am confused about the speed variables in MakerBot Desktop it has two categories “Extrusion Speeds” and “Extruder” and under each is a setting related to speed but is it the speed of extrusion or the speed of the head movement… Which category is which… ? If that is confusing I can post photos.
I will try and run off a print at a significantly lower temp, I have yet to try something so low as I googled this filament and got a starting temp of 230…

You have to loosen the nuts on the pad for the buttons and realign it manually, this will remove the tension from the case rubbing on the side causing them to stick.
I know about the missing PTFE guide tubes but that no longer applies to my printer as I tore all the stock extruder shit out and replaced it. I am now using a custom Bowden setup with a hot end that can hit temps up to 300c.

That nub on the filament will aways form. I only ever see mine when changing filaments. It shouldnt clog the nozzle, and if you push extrude in the software, at the right temp, you should see it extrude nicely. I think the super-hot nozzle is damaging the prints. Also standard thermistors are usually rated up to a limit - mines around 230 degrees. Approaching this temp could cause damage to the sensor.
Try heating up the nozzle to somewhere round the 215 mark, send Z axis to a height you can see under it, like 20 mm up, then extrude 5 mm plastic, at a reasonable speed - maybe 30 mm/s, and check whether it comes out well? Point of this test - eliminate the bed, and the layer heights, any incorrect z positioning, from the issue - prove you get nice consistent extrusion.
If you don’t, try seperating your extruder - and feed the filament manually through the hotend. That will prove your hot end and temps are good. You can also feel out the temps - try pushing filament at 180, 190, 200, 210 etc - you’ll soon get a good idea of the right temp to use for different speeds.
With any new firmware, things you need to change/set (or at least check):
- steps per mm (aka steps per unit)
- feed rates for x,y,z and e
- bed size and position
the upgrades you’ve made look awesome, keep em going!
whats that spacer thing on the extruder tensioner? Normally would be a spring or rubber tube that acts like a spring. Again try feeding by hand through the extruder, If you’re happy with the tension.
When I did my firmware upgrade I followed a guide which went over backing up the original values from the printer prior to flashing it and I did all that so I am pretty sure all my values are correct. One thing which I need help with is tuning the heating element PID as Sailfish lacks Autotune…
You did remind me of something however! I am going to poke around the firmware values and see what I can find pertaining to feed rates etc…
How do I go about telling it to extrude a certain length of material? My firmware may be a bit limited compared to come of the more fancy printers but I am working quite hard to make a printer that can hold a candle to a high end one I believe it’s just a matter of time.
So after many trial and error sessions with MakerBot Desktop I decided to purchase Simplify3D which after applying some of the data you provided along with “lowering” my extrusion multiplayer I was actually able to print without clogging!
Using temp of 212c
I am still having a few minor issues however, as evident in the new pictures I attached below. Got any ideas? ( little holes on top minor bulge around waist and just minor little air hole looking spots )


Looking very good - some great overhangs around the eyes - very nearly there!
The few tiny blobs - all aligned to the left, this looks like blobbing on layer change. Bowden extruder? This might be fixed with retraction, try increasing retraction distance and/or retraction speed. Reducing the filament multiplier ever so slightly might also help. Like .98 instead of 1.0, tiny increment.
The tiny air holes, looks like the layers didnt bond properly towards the top. Can you change print speed mid print? Try decreasing speed towards the top of the model. Drop it 10% and see it goes away - if it does, you may need to lower your print speed. Increasing temp a few degrees might also help. Try 215 degrees. Lastly, decreasing layer height should definitey solve it. What layer size was that - 0.2mm? Moving to 0.1mm should solve it. If all else fails, do you have a layer fan already? If its on, turn it off towards the top and see if this improves. Or if its off already try turning it on, or adding one if you dont have one.
good luck!
Thank you!
Yes, it’s a custom Bowden I printed and I am presently using a retraction distance of 1.0mm so I bumped it up to 1.2. I raised the temp to 215 and I am still running my prints off at 0.2mm until I feel confident that the nozzle clogging issue is gone.
I am running off another test print now using the changes.
Note: Printer it’s self does not allow a speed change mid print… Maybe the software will?


Yep the software should do it somewhere. If not just print slower from the outset.
Your retraction distance reminded me of the E3D troubleshooting page, they recommend 2mm-5mm, and acknowledge its a fuction of bowden tube length, sadly no magic formula. My bowdens 45cm, retraction 2.5mm @ 40 mm/s.
9 days later
It’s been a little bit I know but I have been hard at work on rectifying the issues. I do believe that I have reached a point where I can say that everything I was having issues with has been solved.
I want to go over a quick summery of what I had to do in the end:
- Replaced my whole extruder with a Nema 17 5:1 Planetary Geared Extruder - The NEMA 17 alone did not have enough torque to push the filament through the all metal hot end causing the clogs in the nozzle.
- Lowered Printing Temps - 200 - 205c - Using anything higher will cause the PLA to degrade in the nozzle causing, clogs…
- Adjusted printing speed better to suit my extrusion rate - 50 - 65 mm/s w/ variable extrusion multipliers
- Recalculated the extruder steps per mm for use with the new Bowden Extruder which is SIGNIFICANTLY stronger than the last one. I used the following formula to do so: (Steps_Per_Rev * Microstepping * Gear_Ratio) / (3.14 * Effective_Dia) (Note: more info on my community page)
- Replaced my slicing software - Now using Simplify3D and loving it!
I will not be stopping my work on this printer after this little hill I just managed to get over, my goal is to install dual Pv2 Hot Ends and for anyone who might be interested in my work including photos of all of the work from start to finish you may check out my community page here: https://www.facebook.com/xploitninja/ 2
I would really like to thank everyone especially you Sra1, thank you!
-Pyr_X


Most welcome, delighted to hear things are resolved and happy to have helped. Facebook looks great, prints looking amazing, well done!