For instance i had once printed and installed a “high vellocity fan duct” but it destroyed the prints instead of being an improvment 
I’ve added a heated bed, and replaced the standard hot-ends with decent ones. Quite happy with them and more coming 
2 Likes
was that becouse you where upset with the “BuildTak” ?
Actually I’m pretty happy with the results while printing pla on a buildtak surface, not with abs. Velleman says you can print abs on it but I’m not convinced, never did achieve repeatable successful prints…
I find BuildTak preety disappointing, even though I’m printing with velleman’s white PLA it does’t seem to stick very well 
so I’m endlessly wasting the matirial on brims and rafts.
1 Like
Did you try other brands? I only have the red velleman pla and had better succes with other brands. Not that I have adhesion problems (do make sure you have a clean, decreased surface (try window cleaner or brake cleaner)), but the red velleman pla oozes quite a lot more compared to other brands.
RobV
10
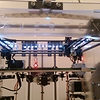
It looks great. Very easy install and just €29,95 for the lights. These are the RGB led’s, the white one is even cheaper.
1 Like
Honestly I still havent finished my first spool of filament yet and since the prints come out fine when using the brim/rafts , I didn’t stand a chance to buy any other to compare it to. What brands would you reccomend for the vertex (PLA)?
It really does and since I’m looking forward to recording a whole lotof time lapses I’m definitly going to install it in the nearest future
I’ve had good results with Conrad filament, and with filament from e3d
thank you i’ll certenly consider changin the brand when the time comes
Hi Matt,
First mod for me was the Z axis stabilizer (Vertex K8400 z-axis stabilizer by h60 - Thingiverse). It’s useful to get a smooth Z movement.
Second one, not sure it’s so useful, is the fan duct (Vertex K8400 Bottom Fan Duct by Hest - Thingiverse) to cool the mainboard.
Caps for unused holes have been done too just for testing the ability to print circles 
When you will use another brand of filament you will need smaller spool (spool for K8400/ K8402 diameter 3,5 cm length 10 cm by maartenverstappen - Thingiverse) but beware, the diameter vary according to the brand… The one above is too small for ColoFabb for exemple.
If you want a simple print giving a neat look to you printer, try it VERTEX - K8400 LCD cover by czvt7w - Thingiverse
I’m now looking for a good head fan duct…
2 Likes
If you’re in Europe, ColoFabb seems to be the best you can find.
I beginner with the Vellemann filament too but needed new colors and tried ColorFabb. You need to relearn everything and to change the settings but the result is far better.
When using BuildTak, you must
- set your head a little down
- print the first layer slowly
- heat a little more
There’s a talk about BuildTak (Talk Manufacturing | Hubs) which can be useful to read.
2 Likes
It could be that the head is indeed a little bit too high. But if it’s to close it will permantly mark the buildtak sheet. It needs to be pretty close indeed, as with all surfaces. Good tip
1 Like
4 layers of paper is the good height for me… Can’t figure what distance it is
Too high it won’t sticks well, to close the head destroys the print. But at the right distance with good temperature and slow speed, it’s for me perfect for PLA (didn’t try ABS for now).
1 Like
Most of the time, i fold a piece of 80g paper in 2, and use that for height calibration. Most of the time some finetuning is necessary, sometimes I stop the print and adjust the setting screw on the back 1/8 - 1/4 of a turn, or I make the adjustments on the go with the setscrews on the bottom of the bed while the printer is still printing a skirt.
It’s been a while since I used buildtak, but was quite happy with it so i bought another one to replace the first. I tried to print ABS without a heated bed but the abs just doesn’t adhere good to the buildtak when its not heated. You can also use the sticker with a heated bed, but one time i tried to loosen a piece which was quite high and had a small base at the bottom. No issues there as the print was fine but when i tried get the piece of the bed, a bit of the sticker broke off and was stuck on the print. The sticker had seen some abuse at the spot that broke though,.
My personal conclusion: It’s great but its not ‘the’ adhesion solution as it is advertised. But you can do nice things with the glass without the sticker on it.
2 Likes
Hi Matt,
On thingiverse I have downloaded and printed the Z axis stabilizer.
with kind regards
Jeroen
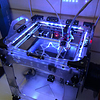
Hey , i added some lights my self below 's the outcome  I useda regullar led strip light (155cm) and attached it with this great design
A custum heatbed.
Top bearing for Z axis. (to eliminate noise when traveling. And add support)
Printed the shield for the display electronics.
Playing around with a 90mm fan mounted horizontal under the buttom, for cooling the mainboard. Instead of the flimsy 40mm fan.
It works ok, but i am going to replace it with a 80mm. Fan instead.
I will post it on thingiverse when satisfied.
Meonys
23
Hi,
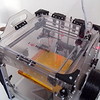
I have added a plexi front door and roof to my Vertex, it protects mechanical part from dust.
I’m looking for filament dust protection to be placed directly on the printer, I can’t found it on Thingiverse so I’m thinking in design it by my own… and share it of course!