Zide
9
I just wanted to mention something really quick.
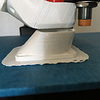
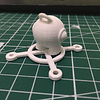
I now printed a fan shroud (https://www.thingiverse.com/thing:878681) which cools the print from all sides instead of only one. It’s not exactly the same as shown in the link, but it overall works. It looks like the warping got reduced a lot, but it is still there. Obviously my 3d printed replacement fan is not as strong as the original one, and I am still waiting for my replacement fan to arrive, but I think that things should get a whole lot better once I get a new fan!
The only thing that I currently don’t like is the bulky design of the fan shroud. It’s almost completely flat with the nozzle and it makes it impossible to see whats going on under there…
I’ll report back once I got a new fan and eventually found a slimmer/higher fan shroud.
Agree with you on the inability to “see what’s happening”. Not too keen on my version which cover all the print nozzle. It works a lot better than the basic shroud, but I can’t watch it, so it feels a little “out of control”  I may try one with multiple nozzles on the shroud rather than a full 360 “loop” to keep my mind at rest?!!
Zide
11
I see. Well I still dont know if the new replacement fan will help with my problem. The new shroud seems like it helps, but its really big. I’m looking for one that eventually sits a little bit higher, but it looks like there are no higher versions of it.
Have you decided on a two-nozzle cooling system yet? I dont seem to find such a cooling shroud anywhere…
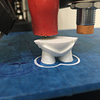
While im waiting for my new fan, it looks like new problems occured. My first layer now seems to be sticking poorly for some reason. I applied new tape, cleaned it with alcohol, even sanding it. The brim and other parts of the first layer curl op on the sides, and it gets worse the more it prints of the brim. I tried loweing the nozzle even more, but I dont know whats going on with my first layer now.
The brim started off weird, and the first layer didn’t stick well, the rest looks normal though. (I’m currently printing another version of the 360 cooling shroud, this time with cooling enabled.)
Hiya,
I have a Simple 1405 so it’s not got the same layout or mounting as the Simple Metal. The version I am thinking of printing is Printrbot fan shroud 1405 by thehair - Thingiverse This is the next version of the one I have already printed as the author upgraded it as he didn’t like his original version.
That brim is weird, not sure what’s going on there?! looks like a weird cooling/warping issue??
Zide
13
Lowering the nozzle didn’t help with the brim. I’ll try sanding the tape, maybe printing brims becomes easier.
The design looks interesting, once I get my replacement fan I will see if that fixes the problem first, and if not I’m going to test different fan shrouds.
EDIT: I’ve found another one. It still has more or less the same design, but at least the nozzle itself becomes visible now. Going to print and try that one out (http://www.thingiverse.com/thing:725248)
Zide
14
Hey everyone again.
I just got my new fan, it looks like it doesnt help with the PLA curling up…
I’m still experimenting with different settings, and I’ll try to print very, VERY slow, as well with less extrusion again, hope that will do.
If this is not going to help, im going to try something new out. I’ve been thinking about using a 12v radial fan together with an adapter (like here http://www.thingiverse.com/thing:1146509) to finally get strong and reliable cooling. These fans are somewhere to 5€, so it wouldn’t be bad to try one out. Unfortunately these come from China, so it’ll take a while.
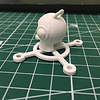
Im going to do a status update once I tested printing slower and with less extrusion. Take a look at the pictures tho, I still get the same problems. Seems like they always occur at the spot farthest away of the fan. I guess the 360 degree cooling shroud doesn’t help much when the fan is too weak.
It looks like you might be printing way too hot or might have a extrusion issue. Might be the first. After you get your fan fix, try lowering the temps in intervals. After I printed the Marvin my first time I realized that 200C was too hot of a layer temp for such a small design. I am using simplify3d and after a few print setting changes I have my first layer still set to 200C but after the first layer I am printing at 184C. My PLA prints are looking 10x better after that small change.
Zide
16
I’m currently printing as low as I can, with 185C. My fan should arrive soon, I’m not sure if it will solve the problems…
Zide
17
It looks like extrusion problems could be the reason for this very well. Cura has settings for the flowrate of the extruder, but I should also calibrate my steps/mm. I’ll see if this helps!
If it ends up the fan doesn’t help it could be a extrusion issue. Try printing at a slower speed such as 20 mm/s to start. If the print still looks terrible drop it down to 15 mm/s. If you can get the print to look good at a slower print speed then you can try increasing the flow rate of the extruded filament as you start bumping up the speed again.
I’ve had similar issues in the past with Cura and my printrbot where parts of the print looked like crap. In the end I discovered that my printrbot was always extruding more plastic than the Cura software expected. Ended up switching to Simplify3d to get the controls I needed to fix this. Not sure if Cura has any additional controls for modifying extrusion in newer versions of the software.
Just a side thought, see if Cura has a outline parameter speed you could adjust. If you could reduce the print speed for the outer walls off the print that could help with both the cooling and extrusion issue. That way you could still print the inside fill at 50 mm/s but when it is printing the outer shell parameters it could print something like 30 mm/s so it would have time to lay down the correct extrusion and still have time to cool properly.
I Had a similar Problem with my Gmax 1.5+ XT. For me the Problem was slic3r was putting too much filament though the nozzle. so I Dropped my flow rate from 1.0 or 100% to .8 or 80% and it has made all the difference (and saved me some filament). It could also be you’re printing your PLA too hot and it can’t cool fast enough (good choice to upgrade the fan), and because of that; the PLA can’t hold it’s shape correctly.
So try Printing at %80 flow rate and dial back the temp and see if that helps.
Zide
21
So no cooling at all?
I just broke my fan blades, so Im waiting for my new fan to arrive 
Anyways, I saw the 360 cooling shroud as well, but many say it does not fit for their Printrbot. Do you think cooling from all sides like the 360 degree shroud does helps things?
Zide
22
Temp is at the lowest it can go, but I think I might be overextruding. So far my flow rate is at 95%, but I’ll try going lower!
Zide
23
The new fan finally arrived, and it’s cooling output is amazing! At least two times stronger than the old fan. The left side of Marvin (which is cooled) looks even better than before, but the airflow still comes from the left, so Marvin is not being cooled good enough on the right. Again I could try rotating Marvin, but there will always be a side which is not going to be cooled. I’m still messing around with the extruder flowrate, the speed and other settings, but I am just not getting anywhere… A thingiverse user pointed out a site (http://www.desiquintans.com/coolingtests) in which a guy tested different fans with different fan shrouds. Looks like the blower fan Im using now is the best one, whilst a normal fan shroud (not this 360 cooling fan) should do the job best.
My cooling really has been improved, but it doesn’t change the fact that the print is only cooled from one side. How are all the printers able to print things fine when many work in the same way as mine? I might consider trying out the 360 degree cooling shroud again, since my new fan can produce enough pressure for that shroud, but I still dont know yet. I’ve turned down the flow rate of the extruder, but I don’t know when the flow rate is correct. How can I see what flow ware suits me best?
Anyways, take a look at the included pictures, and tell me how I should proceed… The 360 degree shroud could be my last guess for fixing my problems, if it’s not I’m going to have to print Marvin with supports.
Zide
24
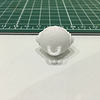
It is done! I finally printed the Marvin without any defects! It was really hard, but in the end the effort was worth it. I had to change many settings, and trying out different attempts of printing the Marvin.
Here is what I did:
I made sure to get a better fan shroud and a new fan. I’ve used a small radiator fan, which had cost me around 5€. This radial fan in edition with a new and better 360 degree fan shroud this really made a big difference!
The warping still occurred, so I experimented with more things. I ended up mounting a bigger 80mm fan to the print bed, which helped to cool the print more evenly. I also finetuned the probe offset.
The last thing that made a great difference was using a different slicer. Simplify3D, you did a great job! At first using the program seems complicated and Cura seems alot easier at first, but once I had set up everything as I needed to, the slicing and overall experience with it was wonderful. It somehow only took one hour to print, and I could go much slower and at a higher resolution, but the print came out much better than the one printed with Cura.
The print looks cleaner than it is on the pictures, seems like my camera just picked up alot of details.
I hope this will get me accepted as a hub, but I will still try to improve my prints, especially with printing even slower, maybe using a different fan shroud and rotating Marvin so its cooled more evenly.
So far I’m satisfied with what I’ve achieved, and if you compare the first Marvin print (https://3dhubs.s3-eu-west-1.amazonaws.com/s3fs-public/talk/attachments/photo1453398803142.png) with this one (https://3dhubs.s3-eu-west-1.amazonaws.com/s3fs-public/talk/attachments/photo1454880934339.jpg) it made a huge difference!
Gonna do some more prints with different settings again tommorrow before I’ll send in the pictures for the test order but you guys really helped me out.
Thanks!
Looks great dude, glad you got it all sorted! I’ve heard nothing but praise for Simplify3D, I may have to invest!!
Zide
26
I think it is really worth it  Sometimes Simplify3D seems to pause the print for no reason, which is weird, but it is most likely a software problem.
By the way, im printing the last Marvin now, with slow speeds, changed settings and another orientation. I’ll post pics of the final result!
Looking better! Next area to check is your extruder and your filament. You may need to fine tune the screw on top of the extruder. You may have it a tad too tight or too loose which can cause some of those lines in your most recent picture postings.
You can try bumping the shell count under the layer tab in your print settings to 3. A stronger outer wall can help smooth the print a bit.
Another reason lines still may be occurring in your print is due to the filament itself. I just had a recent print turn out similar to your original posting with the lines and ruff patches. Spent my entire night last night unraveling the spool to realize that the rest of it was contaminated and unusable.
mcmatt
28
I changed my layer timing to 15 seconds and I was amazed at the improvement. Thanks for the tip.