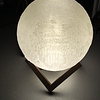
After some rookie mistakes, and a trip back to the Prusa repair shop for my printer, I finally am able to produce something worthwile on my printer. Or at least I could but not anymore. I’ll explain: I have successfully printed the 14cm moon surface nightlight from Thingiverse once and now am trying to repeat this feat but keep failing (4 times already)
It seems to fail when I only have to complete a centimeter of the globe, the printer makes short stops and the vibration seems to wiggle the print loose and starts creating the well known spaghetti.
Things I tried: Increasing the brim or skirt size every print I tried, up to 3cm by now, degreasing the bed, 1st with 70% medical grade alcohol, later with aceton. Updated the firmware with the latest for my make and model. Also: Prusa recommends a bed temperature of 60° C for PLA, which does nothing adhesion wise for me, I’ve increased to 100° C, no results. I’ve placed the printer on a sturdy table now to minimize the vibrations, still no luck. I’ve ran the Live Z adjust and dialed in to 0,780, which gave me clean results at first but now don’t work. And last, I’ve set up a Raspberry Pi running Octoprint, which allowed me to monitor heat of both head and bed, no drops in temperature and everything seemed consistent but still the print failed.
Any suggestion for increasing my success rate is welcome, because it sucks having the print fail 25 hours into the print process, let alone the filament waste of each failure.
For quality finishes, you can get a heated bed 3D printer and cover it with Kapton Tape for a better adhesion and finish. Plus, you can enable retraction in your 3D printer and reduce the minimum travels for better results.
I run my bed at 65 for the first layer. You can run the extruder a little hotter for the first layer also to help with adhesion. Make sure you don’t have an air conditioning duct near by blowing cold air on it also.
You need to get a good squish for the first layer and slow the printer way down. If it is shaking then it is too fast.
cobnut
4
Further to @wirlybird’s reply, also make sure you have the cooling fan turned off for the first layer. Run the z-calibration again and make sure you’re getting a good “flattened” layer on the bed - not too proud of the bed, not too thin. If the first layer onto the bed is very narrow (I don’t know the model shape), then you might need to use some adhesive like 3DLac spray. PLA usually adheres well to PEI, but if the only point of contact with the bed is small, it can be knocked loose.
Bed temp increase or extruder calibration (z height) made no difference to print sticking. What finally fixed it was setting the PLA first layer to 235. Use acetone to clean the print bed. Always set first layer print temp to 235.
I fit works but that is extremely hot for PLA. I still think the real issue is elsewhere.
Are you absolutely sure you are using PLA? Reason I ask is I threw a roll of orange on the other day and started a print going and after a few layers it was lifting up off the bed. Turns out I had grabbed ABS and not PLA!!
I’ve only ever had PLA and it’s from Prusa. I doubt I will ever print with ABS. It was a test print someone created for calibrating the prusa mk3. It printed a 1 layer test shape at 235c. I have had the first layer issue where the individual filaments are visible and the bottom layer of the object doesn’t print very well. 235c fixes that completely. I print the rest of the layers at 215c. Bed at 60c. No amount of first layer calibration cured the first layer problem. I had the bed adhesion issue a week after I started printing and it was persistent and frequent. A real pain in ass. I print the first layer at 30% speed, 235c, 60c bed. Zero issues since following the method!!
Someone did a test of PLA on youtube and found no structural issues printing at 235. For me it’s just the first layer at that temp though.
Got it!
On your first layer are the extrusion lines not touching or showing gaps?
If so then a small adjust to the live Z should help. I generally increase the setting by 0.01-0.02 so like from .320 to .330 and see the results.
Also have you tried moving the model to another part of the bed?
Both of mine seem to have low spots in the same place on the bed.
Yup, first layer the extrusion lines were separate and looking like the filament hadn’t fused together. I did the first layer calibration again and again and no adjustment of live Z fixed it. Also rebuilt part of the printer ensuring there were no build issues. Still same issue. 235c on first layer is the only thing that fixes it. I haven’t tried printing on another part of the bed. Have only done it from the middle.
After I run the V2 calibration code or the first layer calibration from the printer menu I find I still need to adjust the Live Z more to get it dialed in.
I usually will make something like a 40X40mm square to print then once it starts I’ll look at the lines and if there are gaps then adjust the live Z accordingly. Sometimes I find it needs quite a bit of change to start to see an effect.
Adjusting the Live Z by increasing the number should move the nozzle closer to the bed. If you have a fair distance you may have to adjust from like .3 to .6 before you see much change. Just be careful not to run the nozzle into the bed.
Make a change and wait to see. Sometimes the change isn’t instant.
Until you can get a good first layer with the extrusion touching but not too smooshed all other things are going to be problematic. Especially bed adhesion.
Make sure your axes are lubricated. If not, movements are not smooth.
To make adhesion better, wash the bed with liquid soap and don’t wash it completely. It will take care of residual fat.
Try using supports. I’ve had similar issues with first layer bed adhesion and I solved it with supports. Part of the problem you have with this model is you have a very small adhesion area for the size of the model, so you need more and a brim simply won’t be enough.
I’m assuming you use Slic3r so you can generate custom supports using support blockers and enforcers. Here is a video that explains how to use this tool Slic3r PE: Custom Supports aka Support Enforcers and Blockers - YouTube
Print supports from the bed only and use the blockers to keep from filling the orb with unnecessary and wasteful support on the interior.
-Bob