Explique nous aussi toutes les modifications que tu as apportées pour avoir un super résultat! 
Nice community effort indeed! Looking forward to seeing more of your prints @Ponzi3D. I’ve heard good things about the Velleman printers, but didn’t get to see them in action just yet.
Hi Gabriela,
As it’s my first printer, I couldn’t compare but yes a well tuned K8400 seems to be a good printer.
With the help of the specialists here, I can now printed with full speed (120 mm/s) with a good quality.
You can see some of my prints on my hub’s profile and on my Thingiverse account (StephaneAlpha).
Now I’m hopping my first customer order 
1 Like
Totally agree with you for the mac support
What exactly do you need help with @?
Cura works fine on Mac even with very large STL but yes, it’s a bit old interface and settings versus Windows versions…
Another thing to check: firmware settings.
Current firmware version is 1.1 (use M1-V1.1-H1 as your’s single headed)
Here are my settings:
- Vz-jerk: +0,50
- Ve-jerk: 20
- Vmax x: 160
- Vmax y: 160
- Vmax z: 10
- Vmax e: 0
- Vmin: 0
- Vtrav min: 0
- Amax x: 9000
- Amax y: 9000
- Amax z: 100
- Amax e: 10000
- A-retract: 6000
- Xsteps/mm: +134,74
- Ysteps/mm: +134,74
- Zsteps/mm: +4266.6
- Esteps/mm: +150
Looked on your thread on Velleman forum.
I think you problem seems like a pure mechanical problem, not electronic related.
The troubleshooting plan is:
What I would do (sorry if some steps seems mindless):
- dismount everything concerning the print head (steppers, belts, pulley, rods,etc…)
- check if the 4*8 mm rods of the head carriage are the good ones (i mean 298 mm on X axis and 289 mm on Y)
- remount the gliders are at the correct distance (about 33,6 cm and 32.8 cm). One my own vertex, I had to reduce to about 33,4
- insert the 4 8 mm rods, the printed head carriage but without any pulley
- close the rods endstops (the black ones with the bearings)
- now the carriage should move without any resistance. Just moving the printer should move it in all ways
- if needed, tune the lenght between the end pieces of the head carriage
- when every thing is smooth, check if you own the V2 pulley (the ones with 2 screws). If not, ask Velleman for replacement.
- dismount the print head carriage by removing the transmission rods
- reput everything with the pulleys and the belts but without steppers motors BEWARE, the belts have 2 sizes (670 and 685 mm), double check !
- tighten the belt clamps at maximum so the belts are “tighten but not too much”
- align the rods (using a caliper or the printed tool from thingiverse)
- tighten the pulley to lock everything in place
- you could now move the printhead with just a little resistance
- mount back the steppers motors, tighten the belt by pushing the motor down while screwing.
I think this is the most important tuning to do !!! If not enought thightned, the 2 axis will not move synchronised, if too much, the steppers could miss steps and then be not synchronised (I didn’t watch your video seems I’m at work and can’t reach youtube). I think it could also lead to over power needs and drivers overheat…
- add plenty of grease on all rods !
- normally the go home for the vertex’s panel should work well by now.
- with the panel, move the head by 10 mm steps on X and Y axis, again with 1 mm steps then 0.1 mm
- listen the noise of the moves… normally you should hear quite nothing.
- use go home again and calibrate the printbed Z heigth. (4 layers of normal paper could slide between the nozzle and the bed with just a little friction)
- disconnect the PTFE filament tube on the extruder output
- cut the filament just on the output
- extrude (with panel or software) 100 mm of filament and cut it to mesure the lenght. You’ll certainly get about 135 mm. In this case, correct the E stepper value in the firmware from 200 to 150 and test again while you get 100 mm (or 101, it still far better than 135).
- reconnect the tube
After all that work, I can’t see any reason why your printer could be unable to print !
Using your STL, I’ll try to print your part tonight. As you use a Mac too (i think), i’ll send you my Cura settings and the gcode i get, if you want.
I’ll reply to you in french on the Velleman forum.
Here are my Cura settings and the gcode i used to print your test part.
Go there: http://1drv.ms/1QPHC4r
My result is not so bad, I played to print it @ 120 mm/s.
Salut Stephane,
Comment règles-tu ces paramètres?
Merci
Good news… Lots improvements have been made but everything is not perfect for now.
You can have more information here: http://forum.velleman.eu/viewtopic.php?f=62&t=14848&p=69302#p69302
If you can still help me improving the print quality, I’d really appreciate.
Hi,
Great work !!! (on ne parlera pas des vis ici…)
I’ve seen the setting of your slicer, the nozzle setting is not good. Reduce it to 0.35.
I’ll print a Marvin tonight and send you the gcode.
Dans le panel de l’imprimante, je ne sais plus le nom de menus, je vais jeter un oeil ce soir.
Je te répondrais aussi sur le forum Velleman sur tes parmètres de slicer, déjà la taille de buse n’est pas bonne. Essaye d’installer Slic3r, je pourrais t’envoyer les paramètres de mon mac.
Bah… on peux en parler… LöL J’ai eu tellement de soucis de pièces avec l’imprimante que je m’accorde très volontiers cet oubli qui m’aura fait perdre BEAUCOUP de temps!
Thanks a lot for the help, I’ll try a Marvin tonight with the nozzle @ 0.35 (these are the default parameters for the K8400 profile in S3D)
Nickel, merci beaucoup… J’avance bien, ces derniers temps!
Hi,
Did you get a new improvement ?
Hi all 3DHubers,
Just a last word on this topic before closing it…
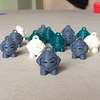
I’ve printed a full army of Marvin, improved and fixed the Vertex itself, improved my skills in print parameters, thanks for you all for that.
My conclusion is: Vertex and Marvin are not compatible… Or I’m not Vertex compliant.
Ok, iI didn’t try to use another slicer (I use Cura which works fine with every other prints).
My army and the best Marvin ever:
Didn’t take a photo… sorry.
The print is a bit better… which is not sufficient for me. Could you please provide a Marvin gcode and some photo of yours so I can test if my printer without having to deal with the settings first?
Hi Dominique,
I’ve just tried ColorFabb samples (black and glowfill) and another Cura setting.
It’s still not perfect but really really better than the first Marvin 
Here are the pictures.
Here is the gcode I used http://1drv.ms/1NiOiHC
The tip is to slow down the print speed and the flowrate. It’s sliced @30mm/s and the rate @ 80% so it print really slow (about one hour for Marvin !).
The last thing to correct is the last layers (on the hook) which are still ugly.
Hope it will help ou to get the quality.