100 mm/s ?
How did you tune everything to obtain such a speed ?
I’ll try to push it when i’m sure the belt are all OK.
Thanks, Sketch
Thanks,
I hope succes, but it will be many hours of tuning before it.
Continuons en anglais, pour rester en communauté mondiale 
The Z stabilizer is the one you mentionned, not sure it’s so usefull than it means but i’m now sure not to suffer z wobbling.
The pulley where aligned using the self printed alignment tool, usefull (why didn’t velleman provide it !).
The belt wich where under tightned was the ones between the motors and the shafts. Just unscrewed a bit and pull it down. The movements are visibly smooth, by hand and motor. I think about redrawing the motors support to include a screw for belt tithening…
I’ll check flow rate. Cura asks for 90% but i’m not really sure the gcode contains this value.
By the way, as a Mac user, i’m really sad about bad support from velleman when not using windows/repetier host…
Sketch
13
Apart from the belts, cooling of the stepper drivers is also very important. (under the machine) .
If the drivers overheat, layers shift. So make sure air flows nicely over your circuit board. (Possibly with the housing I designed (newsketch.nl) or use an other design from the Velleman forum.
As long as you don’t have shifting layers, you should be ok with 100 mm/s. I had a lot of problems with the drivers (returning them etc) but never with the belts.
I havent seen a shifted layer since I installed the housing many prints ago.
What a great housing !
I’ll try to print it, thanks for the tip.
Sketch
15
tnx! be careful with the positioning…(print a small skirt for checking) as it only just fits. I wonder how it works out! Gr.
Inbeso
16
I did receive two bottem plates instead :-). Received like you some spare parts as well for the second extruder. You do need these if you would like to install a second extruder.
I have seen some influence with air flow that comes from all sides. Many people have developed special ventilation nozzles so probably it is worth investigating this.
With great surprise the test passed…
Ah… un peu étonné quand même… Tes clients risquent de te mettre des mauvaises reviews si tu n’améliores pas ta qualité d’impression, selon moi.
Ce n’est pas un jugement de valeur… ma K8400 me fait de bien plus grandes misères encore! 
Etonné aussi !
Je fais un dernier test actuellement avec toutes les corrections suggérées, c’est le jour et la nuit. Je vous poste ça demain en anglais 
Hi all,
Thanks a lot and a lot for all your precious advices !
Lots of improvements have been made to my Marvin…
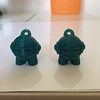
First test: untightening the X and Y motor belt (2 images on the left)
A big big forward step !
Also tried to cooldown mainboard using a print found on thingiverse (Vertex K8400 Bottom Fan Duct by Hest - Thingiverse) but no improvement. I sure it will help in the future.
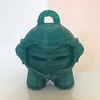
Next test: calibrating E stepper… Velleman firmware says 200 steps/mm, the real good value is about 150 steps/mm. Change it and , miracle, no more over extrusion (under extrusion to be honnest) (center image)
Last Marvin (i begin to hate him :)) resliced with 100% extrusion flow and I now think I’m done with physical issues. (right image)
Of course it’s still not perfect but I’ll try to improve it more by changing Cura settings.
Thanks again million times for your help, this community is really great.
Explique nous aussi toutes les modifications que tu as apportées pour avoir un super résultat!
Nice community effort indeed! Looking forward to seeing more of your prints @Ponzi3D. I’ve heard good things about the Velleman printers, but didn’t get to see them in action just yet.
Hi Gabriela,
As it’s my first printer, I couldn’t compare but yes a well tuned K8400 seems to be a good printer.
With the help of the specialists here, I can now printed with full speed (120 mm/s) with a good quality.
You can see some of my prints on my hub’s profile and on my Thingiverse account (StephaneAlpha).
Now I’m hopping my first customer order
1 Like
Totally agree with you for the mac support
What exactly do you need help with @?
Cura works fine on Mac even with very large STL but yes, it’s a bit old interface and settings versus Windows versions…
Another thing to check: firmware settings.
Current firmware version is 1.1 (use M1-V1.1-H1 as your’s single headed)
Here are my settings:
- Vz-jerk: +0,50
- Ve-jerk: 20
- Vmax x: 160
- Vmax y: 160
- Vmax z: 10
- Vmax e: 0
- Vmin: 0
- Vtrav min: 0
- Amax x: 9000
- Amax y: 9000
- Amax z: 100
- Amax e: 10000
- A-retract: 6000
- Xsteps/mm: +134,74
- Ysteps/mm: +134,74
- Zsteps/mm: +4266.6
- Esteps/mm: +150
Looked on your thread on Velleman forum.
I think you problem seems like a pure mechanical problem, not electronic related.
The troubleshooting plan is:
What I would do (sorry if some steps seems mindless):
- dismount everything concerning the print head (steppers, belts, pulley, rods,etc…)
- check if the 4*8 mm rods of the head carriage are the good ones (i mean 298 mm on X axis and 289 mm on Y)
- remount the gliders are at the correct distance (about 33,6 cm and 32.8 cm). One my own vertex, I had to reduce to about 33,4
- insert the 4 8 mm rods, the printed head carriage but without any pulley
- close the rods endstops (the black ones with the bearings)
- now the carriage should move without any resistance. Just moving the printer should move it in all ways
- if needed, tune the lenght between the end pieces of the head carriage
- when every thing is smooth, check if you own the V2 pulley (the ones with 2 screws). If not, ask Velleman for replacement.
- dismount the print head carriage by removing the transmission rods
- reput everything with the pulleys and the belts but without steppers motors BEWARE, the belts have 2 sizes (670 and 685 mm), double check !
- tighten the belt clamps at maximum so the belts are “tighten but not too much”
- align the rods (using a caliper or the printed tool from thingiverse)
- tighten the pulley to lock everything in place
- you could now move the printhead with just a little resistance
- mount back the steppers motors, tighten the belt by pushing the motor down while screwing.
I think this is the most important tuning to do !!! If not enought thightned, the 2 axis will not move synchronised, if too much, the steppers could miss steps and then be not synchronised (I didn’t watch your video seems I’m at work and can’t reach youtube). I think it could also lead to over power needs and drivers overheat…
- add plenty of grease on all rods !
- normally the go home for the vertex’s panel should work well by now.
- with the panel, move the head by 10 mm steps on X and Y axis, again with 1 mm steps then 0.1 mm
- listen the noise of the moves… normally you should hear quite nothing.
- use go home again and calibrate the printbed Z heigth. (4 layers of normal paper could slide between the nozzle and the bed with just a little friction)
- disconnect the PTFE filament tube on the extruder output
- cut the filament just on the output
- extrude (with panel or software) 100 mm of filament and cut it to mesure the lenght. You’ll certainly get about 135 mm. In this case, correct the E stepper value in the firmware from 200 to 150 and test again while you get 100 mm (or 101, it still far better than 135).
- reconnect the tube
After all that work, I can’t see any reason why your printer could be unable to print !
Using your STL, I’ll try to print your part tonight. As you use a Mac too (i think), i’ll send you my Cura settings and the gcode i get, if you want.
I’ll reply to you in french on the Velleman forum.